|
| 411-1 | Print | Close [X] |
Jenny Barnett Rohrs demonstrates an inlaid die cutting technique to create card designs.
|
For More Information Visit: |

Inlaid Die-Cutting Technique and Card
By Jenny Barnett Rohrs
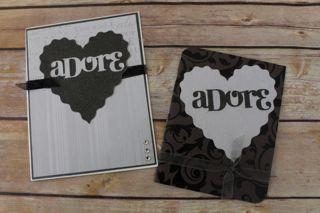
Inlaid Die-Cutting sounds pretty fancy...but really, it's just the process of using ALL the pieces from a die cut (manual or electronic) and using the positive and negative shapes together so that you fit the pieces back together to make a flat design, rather than layering them on top.
And best of all? You get TWO versions of every card! (I love a two-fer!)
Materials needed:
- Brother ScanNCut-home and hobby cutting machine.
- Dies or artwork
- Glitter Paper (I used the Glitter Stack from DCWV because it won't rub off.)
- Complementary cardstock for the base.
- Ribbon
- Stick On glitter Gems
- Score Tape 2" width OR a tape runner and sticky tape
First, let's cut our images. These are the directions for the digital version.
- Select a heart shape. Resize it to about 3.5 inches.
- Select the word "adore" from the image library, and drag it into the heart shape. Resize it so it fits!
- Place glitter paper on the cutting mat, and cut out.
- Repeat with the second sheet of glitter paper.
- (If you're fancy, you can link the images together, and then copy the whole thing to a different part of the mat. Then you can load the mat with your two papers and just cut once.)
Now for the "Inlay" part! carefully remove all the piece- keep special track of the tiny bits, like the inside of the "a" and "d'- they like to escape from you!
- Lay your heart RIGHT SIDE DOWN on top of a non-stick mat or wax paper. Lay a piece of Scor-Tape across the opening for your word. Use more than one piece if you need to, and make sure it doesn't hang off the edges.
- Flip the heart right side up. Using the second color of paper, lay the die-cut word into the negative space. You can use an awl to position it, and then use your finger to burnish it down.
- Now use the inside of the letters from the same paper as used to cut the heart shape to fill in the empty spaces of the word.
- Now you can add your inlaid image to a card, scrapbook, or gift bag- the adhesive is already on the back!
For more information visit www.crafttestdummies.com
Jenny Barnett Rohrs & Julie Fei-Fan Balzer  |
|