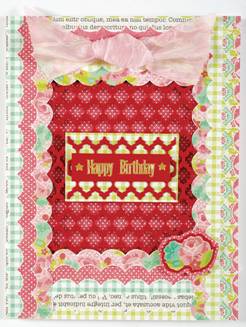
Happy Birthday card by Gail Booth
Presented by Sara Naumann
Designer Tip: Make an extra die-cut with your Fancy Lattice cutting die and cut in strips for extra embellishments.
- Penelope Paper Pack by Hot Off The Press
- 1 1/2” wide pink crepe ribbon
- Red cardstock
- Fancy Lattice cutting die by Hot Off The Press
- Gold Tiny Words and Phrases Dazzles™ by Hot Off The Press
- Die-Cutting Machine
- X-acto® Knife
- Cutting Mat
- Zots™ adhesive dots
- Foam tape
- 5”x6 1/2” blank white card
Instructions:
- Die cut two Fancy Lattice die-cuts from red cardstock.
- Card Front: Open your card and place face up on your cutting mat, with the fold running vertically. Cut 3 1/4”x4” window from the center front ONLY. Close your card, with the fold on the left and place a red Lattice die-cut over the window, gluing only the edges to the front of the card.
- Cut along a Penelope rose print scallop edge, the length of the 12” paper. Cut 1.5”x12” strip, measuring from the edge of the scallop for the width. Cut two 5” lengths of the strip and place on the upper and lower edges of the card on top of the Lattice die-cut.
- Again, cut out along a rose print scallop edge, the length of the 12” paper. Cut a 1”x12” strip, then cut two 6 1/2” lengths of the strip and place on the left and right edges of the card.
- Cut 2 1/4”x1 3/8” piece of the other Lattice die-cut. Mat on Penelope green check with a 1/16” border and glue centered on the lattice window. Place “Happy Birthday” and two star Dazzles™ on 2 1/8”x1/2” red cardstock and foam tape as shown.
- Cut out a small flower from the Penelope pink floral paper, mat on red cardstock then on Penelope pink dotted with 1/16” borders and foam tape as shown. Knot a 6” length of Penelope pink crepe ribbon and Zot™ as shown, trimming the ends.
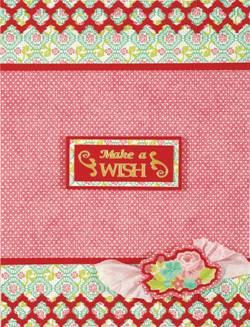
- For the inside: Cover with Penelope pink dotted. Place two 5”x 1 3/8” red cardstocks on the top and bottom edges, then two 5”x1 1/4” Penelope red/green floral strips as shown.
- Cut three 5/8” wide strips of the Lattice die-cut and glue along the top and bottom. Place the “Make a Wish” and scroll Dazzles™ on a 2”x3/4” red cardstock rectangle. Mat on Penelope red/green floral with a 1/8” border, then on red with a 1/16” border and foam tape in the center.
- Cut out a flower cluster from the Penelope pink floral paper, mat on red then on Penelope pink dotted with 1/16” borders and foam tape over a 3” length of ribbon as shown.
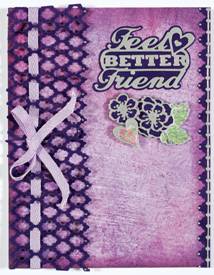
Feel Better Friend card by Gail Booth
Presented by Sara Naumann
 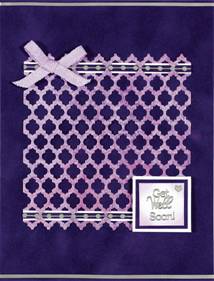
Designer Tip: Tape the end of a length of ribbon to make it easy to weave through your Fancy Lattice die cut.
Supplies:
- Painted Flowers Paper Pack by Hot Off The Press
- Fancy Lattice Cutting Die by Hot Off The Press
- Violet Suede paper by Hot Off The Press
- 1/4” wide metallic lavender ribbon
- Silver Get Well Dazzles™stickers by Hot Off The Press
- White Cardstock
- Blackberry Chalk ink pad by Clearsnap
- Cosmetic sponge
- Zots™ adhesive dots
- Foam tape
- Die-cutting machine
- 5”x6 1/2” white card and envelope
Instructions:
- Card Front: Place your card with the fold on the left. Cover with Painted Flowers purple floral paper and ink the edges Blackberry. Use the die-cutting machine to create a Fancy Lattice die-cut from Violet Suede paper. Save the evacuated suede piece for the border.
- Cut two 2” wide strips from the die-cut. Place a strip vertically and weave a 10” length of ribbon through the second set of cutouts from the left, tucking the upper end of the ribbon under the die-cut edge. Keep the lattice even with the fold of the card. Repeat the process with the other strip. Tie the ribbons into a bow at the center, ruffling the lattice strips evenly and Zotting™ down the bow and the lattice where needed. Place small Dazzles™ dots from “bandages” on every other lattice point, as shown.
- Cut the saved edge of the evacuated suede piece to 3/8” wide and glue on right edge of the card, trim as needed. Place a dotted Dazzles™ border on the edge and use Dazzles™ dots on points of the Lattice border as shown.
- Place the “Feel Better Friend” Dazzles™ on violet suede and cut out with a 1/16” border. Glue on the top right of the card. Back two flower Dazzles™ with suede and the leaves with Painted Flowers green floral paper, cut next to the Dazzles™ edges. Back a large heart with Painted Flowers green floral and foam tape all as shown.
- For the inside: Cover with suede paper. Create a Fancy Lattice die-cut from Painted Flowers purple floral paper. Place with the long edge running vertically and cut 3/8” from the top edge.
- Cut two 6”x1/8” strips of suede paper, mat on white with 1/16” borders and use to weave through the upper and lower edges of the Lattice. Trim the ends even with the Lattice and glue centered on the card. Place dotted Dazzles™ border on the suede strips. Zot™ a small bow as shown.
- Place “Get Well Soon!” and small heart Dazzles™ on a 1” square of white cardstock, with the edges inked. Mat on suede paper then again on white cardstock with 1/8” borders. Foam tape as shown.
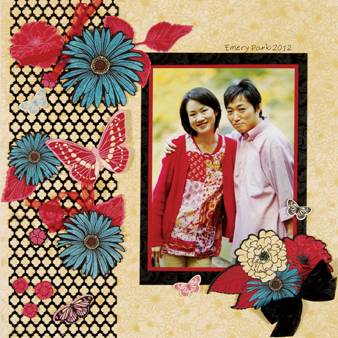
Emery Park page by LeNae Gerig
Presented by Sara Naumann
- Fancy Lattice Cutting Die by Hot Off The Press
- Fresh Cut Blossoms Paper Pack by Hot Off The Press
- 1/4" wide red sheer ribbon
- 3/4" wide black crepe ribbon
- 30 Fresh Cut Die-Cuts by Hot Off The Press
- 2 Black Lace Shine Design Papers by Hot Off The Press
- Die Cutting machine
- Red cardstock
- Zots™ Adhesive Dots
- Foam tape
- Fine tip black pen
Designer Tip: To create a 12” long lattice, cut 3 Fancy Lattice pieces and align them on the page, trimming the excess.
Instructions:
- Die-cut three Fancy Lattice pieces from Black Lace Shine Design papers. Glue each piece 1/4” from the left side of the Fresh Cut Blossoms yellow floral 12”x12” paper.
- Foam tape the die-cut shapes along the lattice as shown. Tie red sheer ribbon bows and Zot™ under the two largest blue flowers.
- Mat the 5”x7” photo on red cardstock, leaving a 1/8” border and then on Black Lace Shine Design, leaving a 3/8” border. Glue the photo 1” from the right and 2” from the top. Use the pen to write along the top edge of the mat.
- Foam tape a cluster of die-cut flowers to the bottom right corner of the photo. Foam tape 2 small butterflies as shown. Tie a black ribbon bow and Zot™ to the bottom right edge of the flower cluster.
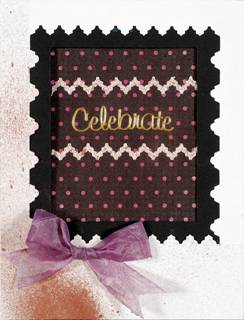
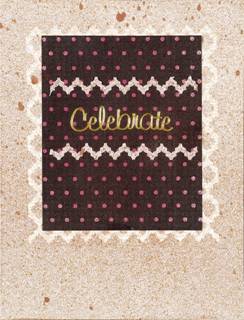
Celebrate Card by Abbie Friesen
Presented by Sara Naumann
- Fancy Lattice Cutting Die by Hot Off The Press
- White Truffle Paper Pack by Hot Off The Press
- 3/4" wide white sheer ribbon
- Gold Greetings Dazzles™stickers by Hot Off The Press
- Glimmer Mist™: Pomegranate, Coffee Shop
- Die-cutting machine
- Black cardstock
- Zots™ Adhesive Dots
- 5”x6 1/2” blank white card
Designer Tip: Add contrast and make the masked Fancy Lattice die-cut shape of cream paper really pop by spritzing it with Glimmer Mist™.
Instructions:
- Card Front: Place your card with the fold on your left. Spritz with Coffee Shop Glimmer Mist™ on the bottom left. Use your die-cutting machine to cut the Fancy Lattice design 1/2” from the top of ONLY the card front.
- Cut 5”x6 1/2” black cardstock. Cut out a 3”x3 1/2” square centered 1” from the top. Glue to the backside of the card front.
- Spritz a 9” length of white sheer ribbon with Pomegranate and Coffee shop; let dry. Zot™ a bow of the ribbon on the bottom left, and cut a “V” in the ends.
- Inside: Cut 5”x6 1/2” White Truffle cream paper. Glue each corner of the Fancy Lattice centered 1/2” from the top. Spritz with Coffee Shop. Pull off the Fancy Lattice and glue the paper to the card.
- Cut 3 1/4”x4” White Truffle black dot paper. Spritz with Pomegranate and Coffee Shop. Glue centered 1” from the top. Cut two 3” lengths of a Fancy Lattice row. Glue one 1” from the top and the other 1” below. Place the “Celebrate” Dazzles™ centered as shown.
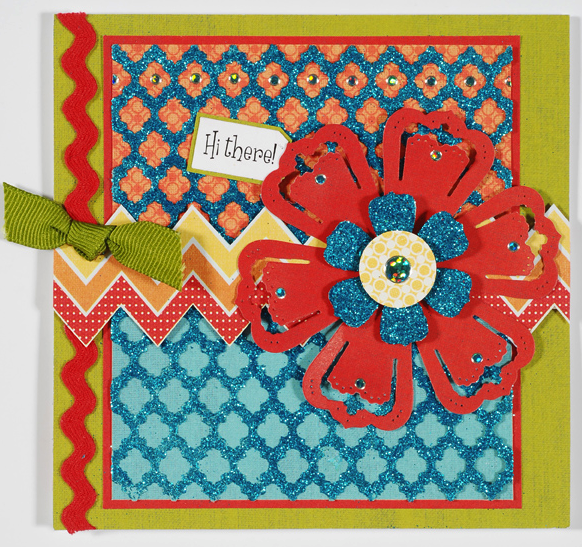
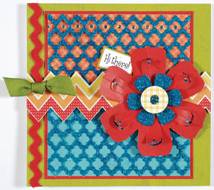
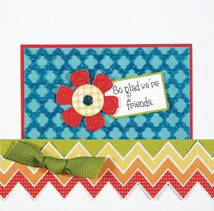
Hi There! Card by Susan Cobb
Presented by Sara Nauman
Supplies:
- Happy Days Paper Pack by Hot Off The Press
- Fancy Lattice Cutting Die by Hot Off The Press
- Bodacious Blooms cutting die by Hot Off The Press
- Teal Jewel Dazzles™ stickers by Hot Off The Press
- POW Glitter paper
- 1/2" wide green grosgrain ribbon
- red rick rack
- Die-cutting machine
- X-acto® knife
- 3/4" round punch
- Zots™ adhesive dots
- Foam tape
- White cardstock
- Black pen or computer printer
- 5”x6 1/2" blank white card
- Font: Grenouville, 22pt
Instructions:
- Card front: Trim a blank card to a 5” square and place with the fold on top. Cover the front with Happy Days green textured paper. Cut a 3 7/8”x4 3/8” Happy Days orange circles paper. Cut a 3 7/8”x2 3/16” Happy Days blue textured paper and glue even with the bottom edge of the orange circles paper. Mat on Happy Days red textured paper with 1/8” borders. Glue centered on the card front. Glue red rick rack down the left side of the card, trimming edges evenly.
- Die cut a Fancy Lattice shape from blue POW glittered paper. Glue the die-cut centered on the card front.
- Cut out a 5” length of Happy Days zigzag paper. Cut along the zigzag section and place centered across the card front. Foam tape the ends to the card front. Trim the edges evenly with the card.
- Use the Bodacious Blooms cutting die to cut the 3 1/4" boom from Happy Days red textured paper. Use your fingers to curve the inner petals. Then cut the small Boom from Happy Days blue glittered paper. Foam tape the glittered flower centered onto the red flower. Punch a 3/4" Happy Days yellow patterned circle and foam tape centered on the blue glittered flower. Add teal Jewel Dazzles™ as shown and in between the lattice openings at the top.
- Finish the front: Write or computer print “Hi there!” on white cardstock. Trim to a small tag shape and mat on Happy Days green textured paper with 1/16” borders. Zot™ the tag angled near the red flower as shown.
- Tie a knot in a 3” length of green grosgrain ribbon and Zot™ to the left side of the card as shown. Place Teal Jewel Dazzles™ stickers on the flower petals, center, and centered inside the top row of spaces between the glittered lattice.
- Inside: Die cut a second Fancy Lattice shape from blue POW glitteredpaper. Trim 3 7/8”x2 3/4" section from the top of the die-cut. Cut 3 7/8”x2 3/4" light Happy Days blue textured paper and glue the glittered die-cut even with the edges. Mat on Happy Days red textured paper with 1/8” borders. Glue centered 1” from the top.
- Cut out a 5” length of zigzag paper as you did for the front. Back the yellow edge with Happy Days green textured paper and glue across the bottom of the glittered die-cut, 1/4” from the bottom.
- Use the template to create a Debra Layer #4 flower from Happy Days red textured paper. Punch a Happy Days yellow circle and glue centered on the red flower. Write or computer print “So glad we’re friends.” on white cardstock. Trim into a small tag shape and mat on Happy Days green textured paper with 1/16” borders. Zot™ the tag angled over the glittered die-cut. Zot™ the flower over the end of the tag. Zot™ knotted Happy Days green ribbon to the zigzag paper. Place a Teal Jewel Dazzles™ sticker on the flower center as shown.
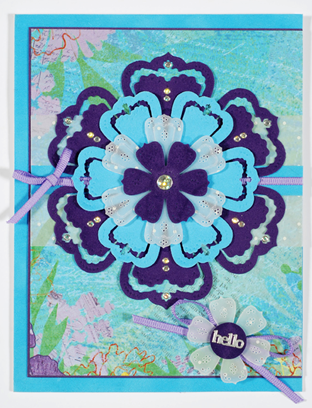
Hello card by Susan Cobb
Presented by Sara Naumann
Supplies:
Bodacious Blooms cutting die by Hot Off The Press
Painted Flowers paper pack by Hot Off The Press
Vellum dots by Hot Off The Press
Lt. blue suede paper by Hot Off The Press
Iris suede paper by Hot Off The Press
Silver Jewel Dazzles™ stickers by Hot Off The Press
Silver Words & Phrases Dazzles™ stickers by Hot Off The Press
Purple cardstock
Adhesive
Foam tape
1/2" hole punch
5”x6 1/2" white blank cards and envelopes by Hot Off The Press
1/8” wide lavender grosgrain ribbon
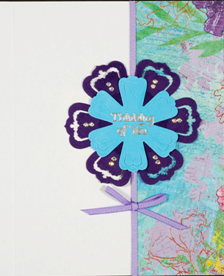
- Place the card with the fold on your left. Cover the front with Painted Flowers blue paper. Mat 4 3/4"x6” Painted Flowers floral on purple cardstock with 1/32” borders. Glue to the front keep the right edge even with the right edge of the card.
- Cut 4 3/4"x2 1/4" vellum and glue 4 3/4"x1/2” Painted Flower blue over the center. Then glue 1 3/4" from the top of the card hiding the glue under the blue paper. Glue lavender ribbon over the blue center.
- Cut a large and small Bodacious Bloom from Iris suede, the medium from Lt. Blue suede and the next to the smallest from vellum. Layer them together with foam tape and glue to the front of the card.
- Tie two lavender bows and glue as shown.
- Cut a small Bodacious Bloom from vellum and foam tape over the bottom bow. Punch a 1/2" circle from Iris suede then foam tape in the center of the bloom. Place “hello” Dazzles™ in the circle.
- Place Silver Jewel Dazzles™ on the blossom as shown.
- Inside: Glue 2 1/4"x6 1/2" Painted Flowers along the right edge. Glue ribbon along the left edge of the paper.
- Cut a medium Iris Bloom and a next smaller Lt. Blue suede Blossom. Glue as shown. Place “Thinking of You” and Silver Jewel Dazzles™ as shown. Tie a bow and glue below the Blossoms.
|
|