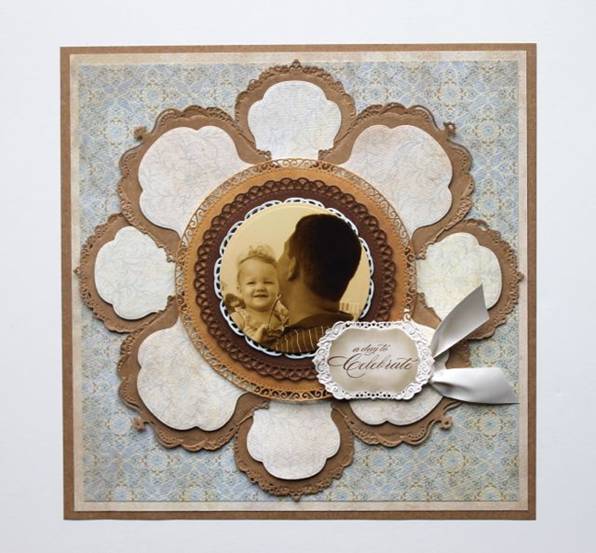
A Day to Celebrate
By Windy Robinson
Spellbinders Supplies:
GC-001 Spellbinders® Grand Calibur® Machine
S4-114 Standard Circles LG
S4-388 Stately Circles
LF-019 Grand Stately Circles
S4-290 Labels Fourteen
S5-159 Gold Labels Four
Other Supplies:
Penny Black®, Inc.: “T for transparent” Gratitude Stamp Set
Bazzill Basics Paper®: Kraft & Cream Smoothies Cardstock
ClearSnap®: Timber Brown Dye Inkpad
Elmer’s®: Craft Bond Quick Dry Glue Pen
Scor-Pal®: Scor-Tape™
Scrapbook Adhesives by 3L™: 3D Foam Adhesive Squares
⅛" hole punch
Instructions:
- Trim an 11 ½" x 11 ½" piece from patterned paper and an 11" x 11" piece from coordinating patterned paper. Layer trimmed pieces and adhere to a 12" x 12" piece of Kraft cardstock to create background.
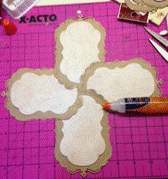
- Cut/emboss 4 each of Gold Labels Four #4 and #5 (with number #1 being smallest die template) from Kraft cardstock for medallion petals using Grand Calibur® machine.
- Cut/emboss 4 each of Labels Fourteen #4 and #5 from patterned paper for center of petals.
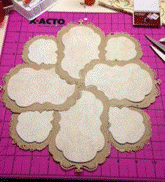
- Mount matching number die cuts together with foam squares to form petals as shown.
 Create a cross pattern with the large petals. Tuck smaller petals behind large petals to form flower. Adhere flower medallion to background paper. Create a cross pattern with the large petals. Tuck smaller petals behind large petals to form flower. Adhere flower medallion to background paper.
- Cut/emboss Grand Stately Circles #1, #2 and #4 from coordinating patterned paper. Layer and adhere with foam squares. Mount to center of medallion with foam squares.
- Cut/emboss photo with Standard Circles LG #7. Adhere flower center with foam squares.
- Cut/emboss/stencil Gold Labels Four #2 from cream cardstock. With die cut still in die template, apply color to raised embossed area. Stamp sentiment.
- Trim a piece of white cardstock to fit behind solid area of die cut. Attach to back of die cut to create a pouch. Cut a piece of cardstock to fit inside pouch. Punch a hole on one end. Write sentiment on tag and add bow. Slide message inside pouch.
- Attach pouch to layout.
Your creativity is limitless - Explore Beyond™!
|