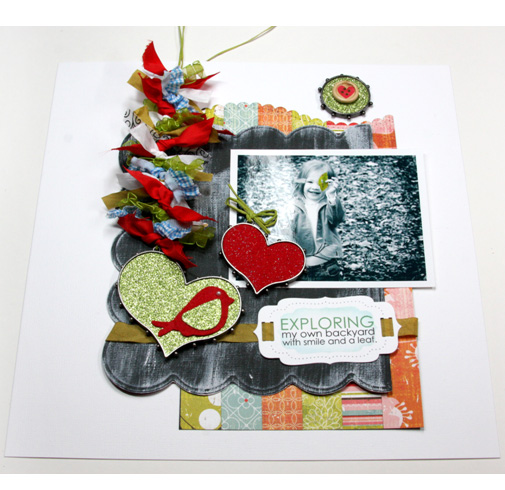
EXPLORING
Lesley Langdon
Spellbinders Supplies:
GC-001 Spellbinders® Grand Calibur® Machine
S5-180 A2 Curved Borders One
S6-005 5 x 7 Elegant Labels Four
MD1-005 Media Mixáge™ Hearts One Dies
MD1-012 Media Mixáge Circles Three Dies
MD2-011 Media Mixáge Birds One Dies
MB1-005S Susan Lenart Kazmer for Spellbinders Media Mixáge Hearts One Bezels
MB1-007S Susan Lenart Kazmer for Spellbinders Media Mixáge Circles Three Bezels
LF-001 Creative Book Pages
Other Supplies:
Want2Scrap©: Baby Bling White Pearls
Bazzill Basics Paper®: white and black cardstock
BasicGrey: Konnichiwa Collection Patterned Paper
BEACON ADHESIVES: Zip Dry™
Elmer’s®: Glue-All® Liquid Glue
Creative Impressions: assorted ribbons - sheer, swirl, dots, seam binding
May Arts: Gingham Blue Ribbon, Fancy Green Ribbon
Light blue inkpad
Soft pink acrylic paint
Home computer and printer
Green raffia
Red and sparkle felt
Green glitter paper
Cereal boxboard
Buttons
Brush
Paper trimmer
Foam applicator
Instructions:
- Cut/emboss Creative Pages #6 (with #1 being smallest die template) from black cardstock using Grand Calibur® machine. Dry brush with soft pink paint for a distressed look. Set aside to dry. Refer to photo.
- Cut six 1" x 12" strips from assorted patterned paper and adhere to a 6" x 12" piece of cardstock. Cut/emboss 1 end with A2 Curved Borders One #2. Layer with die cut from step one.
- Print sentiment on white cardstock. Center sentiment inside Elegant Labels Four #1 and cut/emboss/stencil. With die cut still in die, use an inked foam applicator and apply light blue ink to raised embossed area.
- Thread ribbon through label and adhere label as shown. Secure ribbon ends in back of stripped paper and painted die cut and mount to 12" x 12" white cardstock background.
- Add photo.
- Cut Hearts One Dies #2 and #3 and Circles Three Dies #2 three times each from cereal board. Stack and adhere together. Glue stacked die cuts inside corresponding bezels.
- Cut/emboss Hearts One Dies #3 and Circles Three Dies #2 from glitter green cardstock and Hearts One Dies #2 from red glitter felt. Affix inside corresponding bezels.
- Cut Birds One Dies #3 from red felt and insert from glitter paper. Layer and affix inside #3 heart bezel. Add pearl for eye as shown.
- Add a button inside circle bezel and a twine bow to #2 heart bezel.
- Thread twine through loop on #3 heart bezel, embellish twine with scraps of ribbon tied in knots and adhere heart and knotted ribbons to layout as shown.
- Affix remaining bezels to layout.
Your creativity is limitless - Explore Beyond™!
|