You are....
By Yvonne van de Grijp
Spellbinders Supplies:
Gc-001 Spellbinders® Grand Calibur™ Machine
S5-029 Nested Lacey Pennants
S5-061 Daisy Flower Topper
S2-006 Garden Weave
LF-126 Grand Squares
LF-016 Grand Decorative Ovals One
LF-001 Creative Book Pages
Other Supplies:
Cosmo Cricket™: 400 Stickers Tiny Type
Bazzill Basic Papers®: White 12" x 12" Cardstock
BoBunny Press: Country Garden Morning Sunrise 12" x 12" & 6" x 6" Patterned Paper
Scrapbook Adhesives by 3L™: Thin Foam Squares - White
Buttons Galore & More: Button Bonanza - Pastel
ClearSnap®: ColorBox® Stylus Set
BEACON ADHESIVES: 3-in-1 Advanced Craft Glue
ClearSnap®: ColorBox® Cat's Eye Chic
May Arts: 100% Jute Twine
KaiserCraft: Pets Rub-Ons
Twine
Brown inkpad
Olive green inkpad
Shiny silver cardstock
Mini green button
Basic sewing supplies and sewing machine
Sanding block
Scissors
Paper trimmer
Instructions:
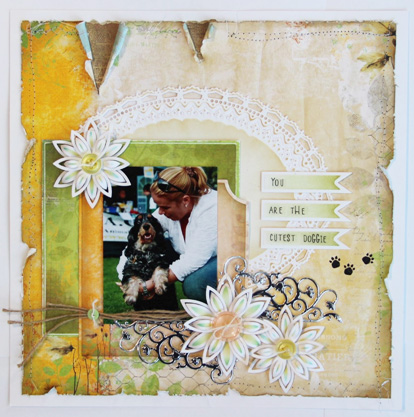
- Trim an 11 ¼" x 11 ¼" piece from patterned paper. Ink and distress edges as shown.
- Affix distressed paper to 12" x 12" white cardstock.
- Using a sewing machine, free form sew around edges of patterned paper. Refer to photo.
- Randomly tear and curl distressed paper edges until desired effect is achieved
- Back torn areas with patterned paper as shown.
- Nest Grand Decorative Ovals #3 and #4 (with #1 being smallest die template) and cut/emboss/stencil from white cardstock using Grand Calibur™ machine. With die cut still in die, use an inked stylus and apply brown ink to raised embossed areas.
- Nest Grand Decorative Ovals #2 and #3 and cut/emboss/stencil from white cardstock using. Stencil with brown ink.
- Cut/emboss/stencil Grand Squares #5 from patterned paper. Stencil with green ink. Sand edges to distress.
- Cut/emboss/stencil Creative Book Pages #4 from patterned paper. Stencil with brown ink.
- Assemble die cuts on page as shown.
- Add photo.
- Cut/emboss/stencil one #4, three #3 and two #2 Flowers with Daisy Flower Topper from white cardstock. Stencil with yellow and green ink. Curl petals and stack die cuts to create 3 flowers. Add twine to 3 buttons and affix in center of flowers as shown.
- Cut/emboss 2 Garden Weave from shiny silver cardstock.
- Cut/emboss/stencil 3 Nested Lacey Pennants Ribbon from white cardstock. Stencil with green ink.
- Using thin foam pads, mount remaining die cuts to page as shown.
- Embellish page with twine, mini green button, alpha stickers and rub-ons. Refer to photo.
Designer Tip:
For added interest, change stitch type when sewing and do not sew over edges in areas with larger tears.
Lightly mist paper edges with water before tearing and curling paper. As the paper dries, it will hold it’s shape.
For a more natural look, use multiple colors of ink when stenciling petals.
The gradation of color on the banners adds depth and a feel of movement.
Your creativity is limitless - Explore Beyond™!
|