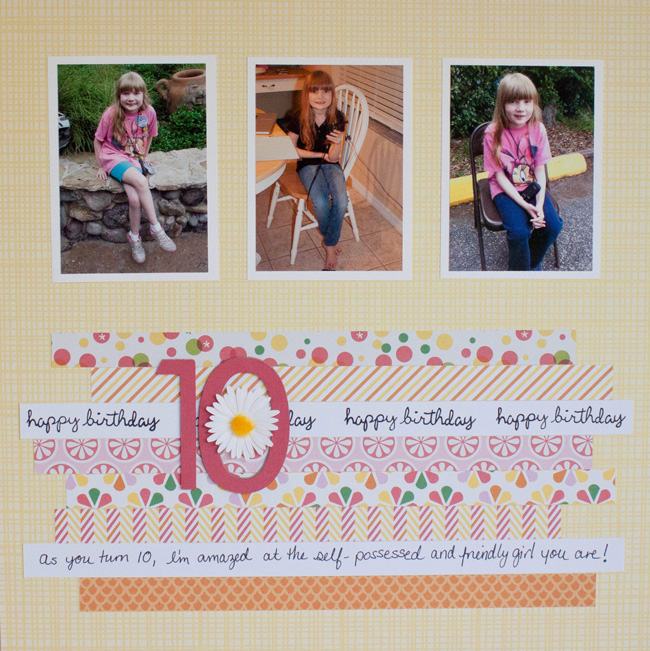
“10” Layout
by Nancy Nally
Supplies:
Layout:
Lawn Fawn “Pink Lemonade” collection
Lawn Fawn “Sophie’s Sentiments” stamp set
Bazzill textured cardstock in White, unknown pink
Bazzill smooth cardstock in White
Font: LD Franks Friends
Silhouette Chipboard
Silhouette Portrait Machine
Ranger Claudine Hellmuth Studio Matte Multi-Medium
Ranger Tim Holtz Distress Ink in black soot
Sharpie Pen
Xyron 510
Glossy Accents
Glue Dots Pop Up Dots
Martha Stewart Daisy stickers
Instructions:
- Print photos 2.5” x 3.5”. Mat on white cardstock, and adhere to background paper.
- Cut two strips of smooth cardstock that are 5/8” wide. On one strip, stamp “happy birthday” repeatedly, leaving room at the ends. On the second strip, write your journaling, again leaving room at the end.
- Cut 5 strips of patterned paper that are 5/8” wide.
- Arrange the 7 strips to cover the bottom of the page, and snip off the ends to make a random staggering. Adhere.
- Die cut the number 10 from chipboard and cardstock. Mat the cardstock to the chipboard.
- Adhere “10” to layout.
- Finish the center of the “0” with a flower sticker.
For more information visit www.scrapbookupdate.com
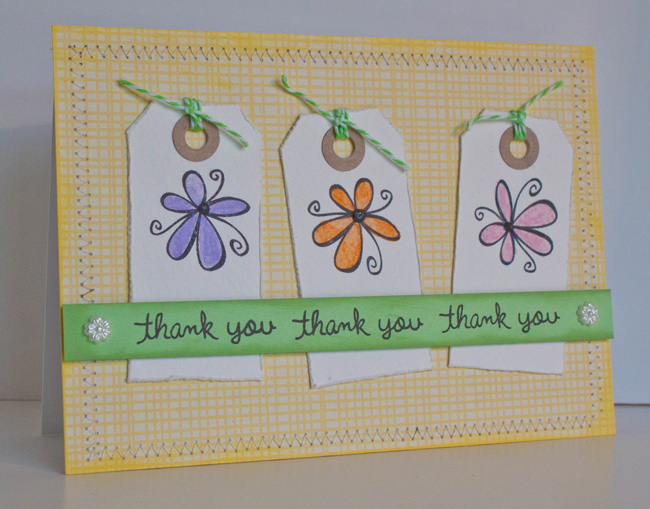
Watercolor Tag Card
by Nancy Nally
Supplies:
Lawn Fawn Petite Florals stamp set
Lawn Fawn Sophie’s Sentiments stamp set
Lawn Fawn 12x12 “Pink Lemonade” - Fruit Punch
Bone Folder
Sizzix Tim Holtz Alterations - Tiny Tabs & Tags Die
Strathmore 140lb Watercolor Paper
Staz-On Ink - Jet Black
Stampin Up Watercolor Wonder Crayons - Soft Subtles (Lavender Lace, Pretty in Pink)
Staedtler Karat Aquarelle Watercolor Crayons - 12 count set (Orange)
Pencil Sharpener
Water
Paintbrush
Ranger Tim Holtz Distress Ink in Squeezed Lemonade and Black Soot
Bazzill Basics 8.5” x 11” Smooth Cardstock in White, Apple Crush and Kraft
Close To My Heart Ink in Sweet Leaf
Tonic Tim Holtz Edge Distresser
Ranger Enamel Accents in Black
Doodlebug Doodle Twine in Bright Assortment
K&Co Pearl Shapes Adhesive Gems
Glue Dots Craft 1/2”
American Crafts This to That 3D Foam Tabs
Instructions:
- Cut 5x7 piece of patterned paper for card background.
- Ink edges and stitch around them.
- Die cut tags out of watercolor paper.
- Stamp flowers with waterproof ink.
- Color the flowers with watercolor crayons and paint with water and a paintbrush to soften and spread the color.
- Distress the tag edges.
- Cut and adhere the hole reinforcer. Tie Baker’s Twiner through it. Add a dot of Enamel Accents to the flower center.
- Adhere the tags to the card.
- Cut a 5/8” strip of green paper. Ink the edges.
- Stamp “thank you” three times along the green paper strip.
- Attach the sentiment strip with foam dot adhesive over the bottom of the tags.
- Adhere pearl accents to the end of the sentiment strip.
For more information visit www.scrapbookupdate.com
Smile Layout
by Nancy Nally
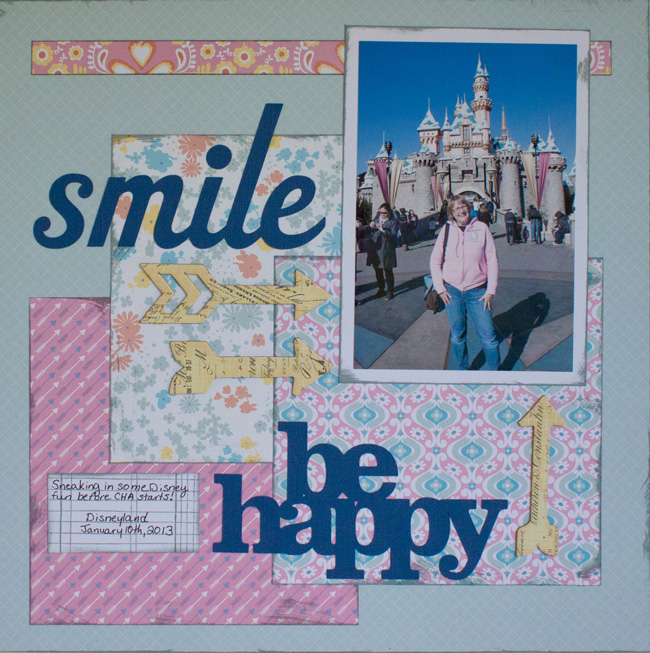
Supplies:
Lawn Fawn “Daphne’s Closet” 12 x 12 patterned paper (Mini Skirt & Favorite Camisole)
Lawn Fawn “Daphne’s Closet” 6x6 paper pad
Lawn Fawn “Schoolhouse Backgrounds” stamps
Ranger Tim Holtz Distress Ink in Iced Spruce
Bazzill Basics Smooth Cardstock in White
Silhouette “be happy” by Lori Whitlock
Silhouette “smile” by American Crafts Garden Cafe
Bazzill Basics textured cardstock in unknown dark blue
Close to My Heart ink in Buttercup
Heidi Swapp Resist Cardstock Embellishments in Arrows
Glossy Accents
Sakura Pigma Micron 03 in Black
Instructions:
- Ink around the edges of 12x12 background paper.
- Cut 5/8” x 10” strip of patterned paper and adhere near top of background.
- Ink edges of 6” x 6” pink patterned paper and adhere in bottom left corner of background.
- Ink edges of 6” x 6” floral patterned paper and adhere in center of background, layered over pink paper.
- Ink edges of 6” x 6” damask patterned paper and adhere slightly above lower right of background, on top of previous patterned paper layers.
- Print 4” x 6” photo. Mat on white paper and ink edges. Adhere in upper right corner of layout.
- Cut “smile” and “be happy” text elements on die cut machine, and adhere.
- Ink chipboard arrows, and adhere pointing to the photo.
- Stamp background stamp on white cardstock. Trim to 1.5” x 2.5” and ink edges. Write journaling and adhere.
For more information visit www.scrapbookupdate.com
Balloon Card
by Nancy Nally
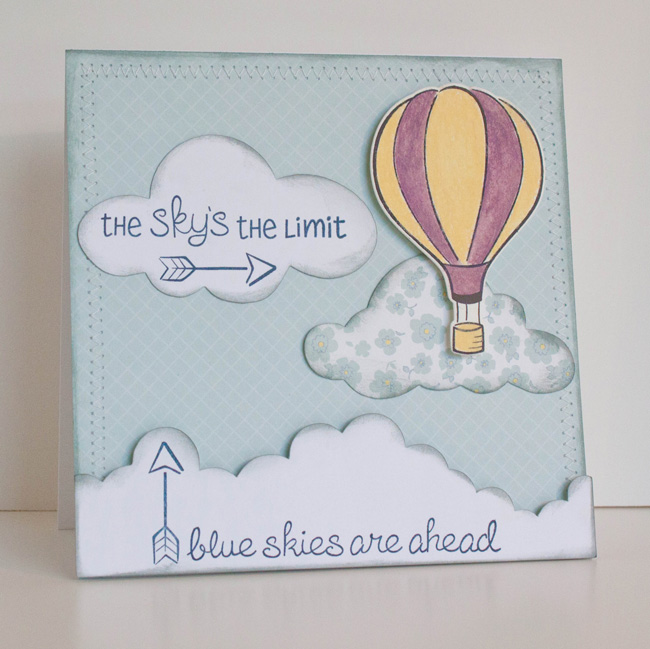
Supplies:
Lawn Fawn “Daphne’s Closet” 6x6 paper pad
Lawn Fawn “Daphne’s Closet” - 12x12 Mini Skirt
Lawn Fawn “Blue Skies” stamps
Lawn Fawn “Blue Skies” dies
Tsukineko Staz-On Ink in Jet Black
Stampin’ Up! Watercolor Crayons in Soft Subtles
Ranger Tim Holtz Distress Ink Marker in Black Soot
Silhouette “5 clouds” by Lori Whitlock
Bazzill Smooth Cardstock in White
Tim Holtz Distress Ink in Iced Spruce
Ranger Inkssentials Ink Tool
Stampin’ Up Classic Stampin’ Pad in Midnight Muse
Bazzill Smooth Cardstock in 12x12 White (for card base)
Strathmore 140lb Watercolor paper
Blue Shop towels
Sewing Machine & Thread
American Crafts “This to That” 3 Dimensional Foam Dots (squares & circles)
Paintbrushes
Water cup
Bone folder
Instructions:
- Cut 6x6 piece of paper for card background. Ink edges.
- Stitch around 3 sides of the card background.
- Die cut clouds. Ink edges.
- Stamp sentiments & arrows on clouds.
- Adhere clouds to card background, using foam adhesive for bottom border.
- Stamp balloon on watercolor paper using waterproof ink. Die cut balloon.
- Use watercolor crayons to color in balloon and then paint with water.
- Adhere balloon with foam adhesive.
- Cut 6x12 piece of white cardstock and fold in half to create 6x6 card base.
- Adhere card front to card base.
For more information visit www.scrapbookupdate.com
|