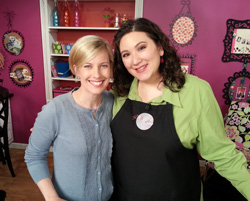
Happy Birthday Card designed by Susan Cobb
Presented by Sara Naumann

Lemonade Stand Artful Card Kit by Hot Off The Press
1/4" wide blue satin ribbon
5”x6 1/2" blank white cards and envelopes by Hot Off The Press
White cardstock
Foam tape
Paper clip
Zots™ adhesive dots
Adhesive
Tip: The die-cuts will have nibs when you remove them from the sheets. To remove the nibs, press over them with your fingernail, use sandpaper or clip off the nibs with scissors before placing them on your projects.
- Turn your blank card so the fold is at the top. Cut 1” off the opening edge of ONLY the card front. Cover the card front with Lemonade Standblue with dots paper. Mat the long edges of 1 1/4"x6 1/2" Lemonade Standred flowers paper on white cardstock with 1/8” borders. Glue to the center of the card front.
- Glue 1 1/2" Lemonade Stand red flowers paper to the bottom of the card inside.
- Remove the white lace border die-cut. Unfold a paper clip and use a straight end to poke out the centers of the die-cut areas. Turn the border over and twist each oval or dot to remove it. Cut one end and glue along the bottom of the blue dot paper without the blue showing. Trim the other end.
- Remove the yellow oval die-cut and use the same technique as in step 3 to remove the circles. Glue in the center of the card front. Remove two white circles with blue flowers and foam tape on each side of the oval.
- Remove the bicycle die-cut, turn over and remove the inside area. Foam tape to the oval. Foam tape the flower cluster die-cut at the bottom left. Foam tape a single cream flower over its matching image.
- Foam tape two butterfly die-cuts on the upper right corner. Cut out the Happy Birthday pennant and glue on the left near the fold.
- Inside: Glue 6 1/2"x5/8” Lemonade Stand blue with dots paper overlapping the Lemonade Standflower paper. Glue the green Celebrate cut-out overlapping the blue paper. Glue a single flower with leaves die-cut over the upper right corner.
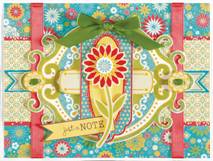
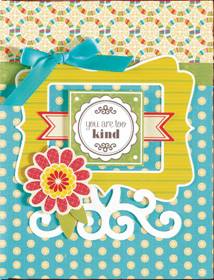
Just A Note card designed by Susan Cobb
Presented by Sara Naumann
- Lemonade Stand Artful Card Kit by Hot Off The Press
- 1/2” wide green satin ribbon
- 1/2" wide red coral satin ribbon
- 5”x6 1/2” blank white card by Hot Off The Press
- adhesive
- Zots™ adhesive dots
- Foam tape
- Sanding block
Designer Tip: Red coral satin ribbon works well to divide the card into distinct sections, with a large die-cut anchoring the center space. I also used ribbon to finish the buttons rather than thread for a pretty look.
Instructions
- Place your card with the fold at the top. Cut 6 1/4"x4 3/4" Lemonade Stand blue/red/yellow/green floral rectangle. Mat 6 1/4"x2 1/2" Lemonade Stand green/yellow tiles paper on Lemonade Stand red floral paper with 1/8” borders. Glue centered across the floral rectangle. Glue red coral ribbon vertically over the sides of the paper, 1” from each end. Glue the ends to the back of the paper. Glue the paper centered on the card front.
- Remove the following die-cuts: the green/blue/yellow/ivory swirl circle, yellow/tan rounded rectangle, tan/blue label, dotted label with a red oval center, two yellow flower buttons, red/yellow flower on stem, tiny blue flower circle. Sand the edges of the green/blue/yellow/ivory swirl circle die-cut to create a white edge. Glue centered over the card front, overlapping the red coral ribbon.
- Cut the tan/blue label in half. Glue the ends centered at each side of the card, even with the paper.
- Foam tape the yellow/tan rounded rectangle die-cut centered across the round die-cut. Foam tape the dotted label with the red oval center vertically as shown.
- Thread green ribbon through the holes in the yellow flower buttons. Trim the ends and Zot at the back to secure. Foam tape a button on each side of the circle die-cut as shown.
- Cut out “just a NOTE” label and glue/foam tape angled over the bottom of the dotted label with the oval center. Foam tape the red/yellow flower with the stem overlapping the words label. Foam tape the tiny blue flower circle centered on the flower blossom. Tie a green satin bow and Zot near the top of the die-cuts.
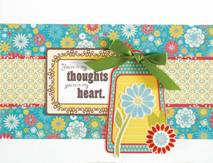
- Inside: Cut a 6 1/2"x3 1/2" Lemonade Stand blue/red/green floral paper and glue centered across the inside. Mat a 6 1/2"x1 1/2" Lemonade Stand tiles paper and mat on Lemonade Stand red floral paper with 1/8” borders. Glue centered across the blue floral paper.
- Cut out the “You’re in my thoughts you’re in my heart.” rectangle and glue centered over the papers, 1 1/2" from the left edge. Remove the blue/yellow dotted tag with red border and glue overlapping the right edge of the words label. Remove a blue flower with stem die-cut and tiny blue flower circle. Glue or foam tape as shown. Tie a green bow and Zot to the top of the tag.
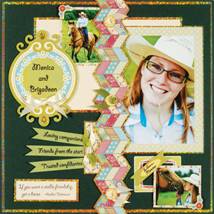
Monica & Brigadoon page designed by Gail Booth
Presented by Sara Naumann
- Lemonade Stand Artful Card Kit by Hot Off The Press
- Two sheets of 12x12 Gold Sparkles Holographic Paper by Hot Off The Press
- Two sheets of 12x12 Dark Green Cardstock
- 1/4" wide ivory satin ribbon
- 1/4" wide green satin ribbon
- Zots™ adhesive dots
- foam tape
- glue stick
- black pen or computer printer
- Font: Giddyup Std., 36 pt. for title, 28 pt. & 24 pt. for journaling
Designer Tip: Search for a related quote on the Internet for an added sentiment about your subject. Adding a little gold sparkle gives a nice “punch” to these sunny papers.
Instructions
- Glue an 11 1/2” square green cardstock on 11 3/4" square Gold Sparkles, then on a 12”x12” green cardstock for your background. Mat an 8”x5” Lemonade Stand yellow texture paper on Gold Sparkles with a 1/8” border and glue 1” from the upper edge. Mat a 4”x6” photo on Lemonade Stand green/orange paper with a 1/2” border, then on Gold Sparkles with a 1/8” border and glue 1/2” from the right edge, 1 1/2” from upper edge.
- Cut out the Lemonade Stand zigzag border and mat on Gold Sparkles strip with a 1/8” border on the zigzag edges. Set on page with right edges overlapping large photo, but do not attach yet. Mat a 2 1/4”x3” photo on Lemonade Stand circle paper with a 1/8” border and glue 1/2” from the upper edge, with the right edge tucked under the zigzag. Foam tape a small flower corner die-cut on the photo. Mat a 1 1/2”x2 3/4” Lemonade Stand circle paper on Gold Sparkles with a 1/16” border and glue 1/2” below the Lemonade Stand yellow paper, with the right edge tucked under the zigzag. Foam tape the zigzag in place.
- Remove the small green/red frame out of the large green frame die-cut and cut out the yellow center. Glue the frame below the large photo. Mat a 2 1/4”x2” photo on Lemonade Stand circle paper and foam tape over the small frame. Write a small sentiment with a pen on the small green label die-cut and foam tape at an angle, as shown. Foam tape a small flower corner die-cut on the photo.
- Computer journal a title on the large green scroll label die-cut. Back the two teardrop die-cuts with Gold Sparkles and foam tape as shown. Zot™ on an ivory bow. Journal three sentiments on 3 1/2”x1/2” strips of Lemonade Stand green paper and cut the left ends in a “V”. Foam tape as shown. Journal a quote on a 3 1/4”x1” Lemonade Stand yellow paper, mat on Gold Sparkles with a 1/8” border and foam tape as shown.
- Tie a knot in the center of three 4” lengths of ribbon, thread the ends through button die cuts (keeping knot on top), trim the ends and foam tape to the zigzag. Tie two lengths of ribbon in a knot, cut the ends at an angle and Zot™ to the rig ht of the green strips.
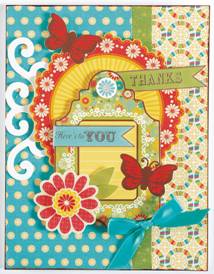
THANKS card designed by Susan Cobb
Presented by Sara Naumann
- Lemonade Stand Artful Card Kit by Hot Off The Press
- 1/4" wide blue satin ribbon
- 5”x6 1/2” blank white card by Hot Off The Press
- Zots™ adhesive dots
- Foam tape
- adhesive
- Dark brown ink pad
Designer Tip: A beautiful mix of red, green, and dark brown papers and die-cuts create a striking contrast for this card. Foam tape adds dimension.
Instructions
- Place your card with the fold at the left. Cover the card front with Lemonade Stand blue/yellow dotted paper. Cover 1 1/2" at the right edge with Lemonade Stand striped circles paper. Glue a 1/2" wide Lemonade Stand green strip even with the left edge of the striped circles paper. Ink the edges brown.
- Remove the following die-cuts: large yellow circle with red floral border, green floral/yellow tag with butterfly, red/brown butterfly, white swirl, pink/ivory flower, green leaves, 3/4" yellow/red flower, tiny blue flower circle.
- Glue the white swirl die-cut even with the fold and 3/4” from the top. Foam tape the yellow/red circle die-cut centered over card front 3/4" from the top, overlapping the white swirl. Cut out the “THANKS” label and glue over the top right edge of the circle die-cut, adding foam tape beneath the edge to fill the space. Foam tape the green floral/yellow tag centered over the circle, 1” from the bottom. Layer the two flowers together with the leaves and glue/foam tape over the lower left corner of the tag. Foam tape the butterfly and tiny blue flower circle as shown.
- Cut out “Here’s to YOU” label and foam tape over the top of the tag, tucking the left edge beneath the tag. Tie a blue satin bow and Zot to lower right corner of the tag.
- Cover the inside with Lemonade Stand blue/yellow dotted paper. Cover the top 1 1/2" with Lemonade Stand striped circles paper. Glue a 1/2" wide Lemonade Stand green strip even with the bottom edge of the striped circles paper. Ink the edges brown.
- Remove the yellow/green striped frame and remaining white swirl die-cuts. Glue centered over the paper with the white swirl tucked beneath the bottom edge of the frame. Glue the red/tan label die-cut centered over the opening of the frame. Cut out “you are too kind” square and foam tape centered over the red/tan label die-cut.
- Remove the remaining pink/ivory flower, 7/8” yellow/red flower, and leaves die-cuts. Layer the flowers and foam tape over the lower left corner of the frame. Zot a blue satin bow to the upper left corner of the frame.
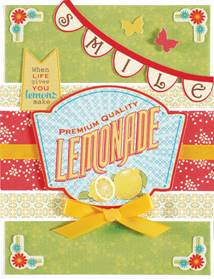
SMILE card designed by LeNae Gerig
Presented by Sara Naumann
- 5”x6 1/2” blank white card and envelope by Hot Off The Press
- Lemonade Stand Artful Card Kit by Hot Off The Press
- 1/4" wide yellow satin ribbon
- White cardstock
- ahhesive
- Foam tape
- Zots™ Adhesive Dots
Designer Tip: Using the images with the same theme on the inside and outside of the card will create a cohesive look.
Instructions
- Place the card fold on your left. Glue 4 3/4” x 6 1/4” Lemonade Stand green floral paper to the center of the card front. Mat the long edges of 5”x3 1/8” Lemonade Stand green tile paper with white cardstock, leaving 1/16” border. Glue 2” from the card top.
- Mat 5”x1 3/4” Lemonade Stand red floral paper with cardstock, leaving 1/16” border. Glue to the center of the tile paper. Glue a length of yellow ribbon across the center of the red border. Foam tape the Lemonade label die-cut to the center. Glue the “When life gives you..,” banner die-cut to the top left side of the red floral border.
- Glue a yellow bow under the lemonade label. Glue the “Smile” banner to the top right corner and trim even with the card edges. Glue corner die cuts to each corner and foam tape a small red and yellow butterfly to the right corner.
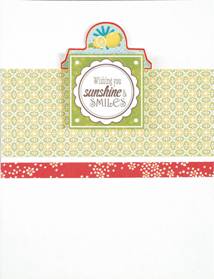
- Inside: Glue 5”x2” Lemonade Stand green tile paper 1 5/8” from the card top. Mat the top edge of 5”x3/8” Lemonade Stand red floral paper with cardstock, leaving a 1/8” border. Glue across the bottom of the green tile. Glue the lemons tab die-cut to the top center of tile paper and foam tape the square green greeting cut-out overlapping it.
Wishing You Gift Bag
By Sara Naumann
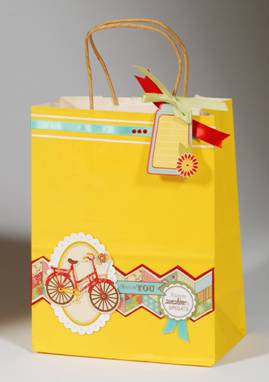
8”x10” yellow gift bag with handles
Lemonade Stand Artful Card kit by Hot Off The Press
3/8” wide red satin ribbon
3/8” wide blue satin ribbon
3/8” wide green satin ribbon
red Jewel Dazzles™ stickers by Hot Off The Press
white Thin Line Dazzles™ stickers by Hot Off The Press
red cardstock
foam tape
adhesive
- Glue blue ribbon 1/2” from the top of the bag. Place a Thin Line Dazzles™ on each side, 1/4" from the ribbon. Place three red Jewel Dazzles™ on the ribbon as shown.
- Cut out the zigzag from the Lemonade Stand paper and mat on red cardstock wth 1/8” borders. Glue 2” from the bottom of the bag.
- Remove the yellow oval die-cut but do not remove the inner circles. Foam tape vertically1/2" from the left side of the bag. Foam tape the bicycle die-cut on top of the oval.
- Cut out the “Here’s to YOU” pennant and the “Wishing you…” circle. Glue the pennant under the oval. Fold a 2” length of blue ribbon and glue under the circle then glue to the border.
- Remove the dotted tag die-cut and tread green ribbon through the hole then tie onto the handle. Write the recipient’s name and the gift giver’s name. Tie a red ribbon onto the same handle.
|