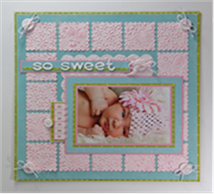
Kiresa Scrapbook Page
By Judy Hayes
Supplies:
Spellbinders™ Grand Calibur® machine; S4-129 Classic Scalloped Squares SM #3, LF-127 Grand Scalloped Squares #4, ES-005 Splendid M-Bossabilities™, EL008 Garden Delight M-Bossabilities S5-094 Labels and Tags
Bazzill Basics Paper ® Prismatics - Iced Pink, Bazzill Fourz - Piglet
Echo Park – Playground: Capture the Flag, Rubber Ball, Jump Rope
Ranger Distress Ink - Spun Pink
Scor-Pal® – Scor-Tape ¼”, ½”
Cosmo Cricket™ Tiny Type Letters – Handwriting
Scrapbook Adhesives by 3L™ – MyStik Permanent
Glue Dots – Craft Glue Dots
Xyron 1.5” Create-a-sticker
Baker’s Twine – pink/white
Maya Road - Bethany Mini Alphabet Chipboard letters
White Acrylic paint
White Buttons – 5 – ¾”; 1 - ½”
Instructions:
- Cut aqua paper to 11 ¾ x 11 ¾”. Center and adhere to green dot on a 12 x 12” page.
- Cut 16 – #3 Classic Scalloped Squares (#1 being the smallest) from light pink paper. Emboss 8 Garden Delight flowers and Emboss 4 with butterfly, and 4 with flower using with Spellbinders™ Grand Calibur® machine.
- Apply ink to embossed patterns by using a hard surface ink pad direct to paper rubbing in a circular pattern. Rotate paper square and work from each edge towards center until ink is evenly applied.
- Cut large square with #4Grand Scalloped Squares(#1 being the smallest square) from light pink paper. Emboss with Splendid M-Bossabilities™ folder (flowers). (Tip: Square is bigger than embossing folder so emboss about 2/3 first time and then 1/3. Place square slightly askew in folder to emboss. This offsets the “seam” where the 2 patterns meet and will be less obvious if the match is off a bit. When sandwiching the M-Bossabilities folder between the mats, keep the edge with paper extending at very edge or slightly extending beyond mat when running it through the Grand Calibur machine. This keeps the folder edge from making an embossed line across the paper that extends beyond the folder.)
- To fasten small squares to page, start with 4 corners. Align the squares about ½” from edges of aqua paper. Then add a flower square at center on each side. Finally fill in spaces between with other squares with butterfly and bigger flower squares. Fasten securely with adhesive. (Tip: Use a 12” clear grid ruler as a guide along paper edge to get squares straight and even.)
- Adhere large scalloped square in center opening between small squares.
- Cut mats for 4 x 6” photo:
- Medium pink – 4 ¼ x 6 ¼”
- Green dot – 4 ½ x 6 ½”
- Aqua grid – 5 3/8 x 6 7/8”
- Medium pink – 5 ½ x 7 5/8”
- Fasten photo to mats in order listed. Apply Scor-Tape to back placing tape along the top, right side and bottom of photo only. No adhesive in center or on left edge so journaling tag can slide under photo. Fasten to scrapbook page.
- Cut strips for title:
- Aqua grid – ¾ x 7”
- Medium pink – 7/8 x 7 1/8”
- Green dot – 3/16 x 6 7/8”
- Fasten aqua to pink. Glue green strip in place.
- Paint chipboard letters with white acrylic paint. Allow to dry or heat set. Apply adhesive with Xyron. Adhere to strip. Use Scor-Tape to fasten strip to scrapbook page above photo.
- Journaling tag:
- Medium pink – 1 ¼ x 2 5/8”
- Green Dot – 1 3/8 x 2 ¾”
- Light pink – 2 5/8 x 5 1/8”
- Print journaling on white cardstock. (Missy BT font used) Cut cardstock to 2 ¾ x 4 1/8”
- Fasten journaling piece to one end of light pink piece. Add 2 strips of Scor-Tape across opposite end.
- Fasten medium pink to green dot so long edges on one side are even. Apply Scor-Tape to back.
- Thread baker’s twine through ½” button holes. Fasten twine ends to Scor –Tape on back of pink/green piece so button laps edge. Trim twine ends. Fasten to light pink piece lapping over journaling piece.
- Cut 6 tiny tags of light pink paper with die template from Labels and Tags. Apply letters to spell name. Fasten each tag with Scor-Tape to journaling tag. Keep ends of tags with hole towards journaling.
- Slide tag in place behind photo.
- Thread baker’s twine through ¾” buttons and tie in bows. Fasten to corners of page with Glue Dots. Fasten one at end of title str Stamp butterfly images with VersaMark on to 12 x 12 pattern paper cardstock base.
- Adhere photos to center of the paper.
- Cut, distress and ink a 2x9" strip of yellow paper and a 1.5x9" strip of blue pattern paper and layer on to cardstock.
- Cut a ¼ “ strip of pattern paper and adhere to layout over top of the first two strips of paper.
- Cut/emboss S4-260 Labels Fourteen #5 (#1 being the smallest) out of brown cardstock using Spellbinders™ Grand Calibur® machine.
- Cut/emboss S4-260 Labels Fourteen #4 out of cream cardstock and add journaling. Layer on to brown label and adhere to layout.
- Stamp flower image on to cream cardstock and cut out with coordinating die template. Color with markers. Adhere beside journaling.
- Using orange ink, stamp dragon fly image on to cream cardstock and cut out with coordinating die template. Adhere to layout.
- Stamp three butterfly images on green pattern paper a smaller one on blue pattern paper. Cut out using coordinating die templates. Adhere to layout using foam squares.
- Cut/emboss AS5-078 Persian Accents border from red pattern paper and adhere under paper strips.
- Add alphabet stickers for title.
|