|
| 209-1 | Print | Close [X] |
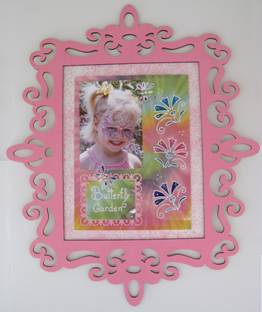
| Julie McGuffee creates a butterfly page that features a vacation story. |
For More Information Visit: www.elmers.com www.xacto.com |
Butterfly Garden Wall Art By Julie McGuffee Custom frame beautiful scrapbook pages and display them for everyone to see! This is the perfect way to showcase your works of “heart” and by using Foam Board for a backing you can change the pages whenever you like.
For this project you will need: Please note: It’s all about the photo so choose paint and paper colors that complement the colors in your photograph. 1. Using the templates and a pen or pencil, trace the flower pattern onto white cardstock. Position a transparency sheet on top of the pattern then using the white painter, trace the pattern onto the right side of the transparency about ½” from the right edge. Note: If you use an ink jet transparency sheet, trace the outline on the front (smooth side). Turn the sheet over then color in the flower petals and leaves with pearlescent painters. 2. Cut a 3 ¾” x 3” piece of transparency for your title then set aside. Using the die, cut two or more butterfly shapes from acetate. Tip: Layer a piece of cardstock on top of the acetate and cut together. Cut a decorative rectangle mat from pink cardstock. 3. Color the front and back of the butterflies with the painter markers. 4. Cut a 3” wide strip from one side of the 12x12 glitter cardstock. Cut one 3 ¾” piece from one end of the 3” strip. Referring to photo to assemble your page: 1. Use double sided tape to adhere the photograph and the pink mat to the left side of the acetate sheet. Align the top and left side of the photo with the edge of the acetate. Position the mat below. The bottom edge of the mat will hang over the bottom of the acetate sheet slightly. 2. Adhere the 3”x3 ¾” piece of glitter cardstock to the center of the pink mat. With right edges aligned, use double stick tape to adhere the acetate sheet on top of the glitter cardstock. Tip: Position the tape behind the photo and the pink mat. Place the title on top of the mat then use the tip of your craft knife to pierce a small slit into each corner of the title. Secure the corners with a small silver brad making sure the prongs go thru to the back of the large glitter cardstock. 3. Carefully bend the butterfly wings upward, then use thin glue spots to adhere the butterflies to the front of the page. Optional Frame to display your page as wall art: 1. Pour paint onto a piece of wax paper. Dip the sponge pouncer into the paint then dab onto a clean area of the wax paper to spread the paint even across the surface of the sponge. Paint the front of the frame by firmly pouncing the sponge up and down. 2. Using a ruler and craft knife, cut a 12”x15”piece of white foam board. Mix equal parts of pink paint and Glue All. Dip the small sea sponge into the paint then lightly sponge paint over the surface of the foam board. While the paint is still damp, sprinkle lightly with glitter. Using the wide end of the glue pen, spread glue on the back of the frame around the opening, then place over the foam board. 3. Adhere the page to the center of the frame with pop up medium glue dots.
Happy Crafting!
|
Julie Fei-Fan Balzer & Julie McGuffee |
|