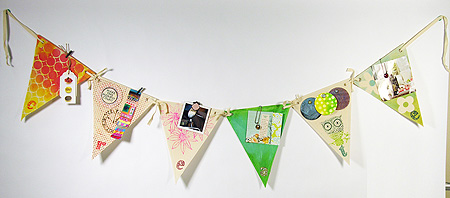
Pin up banner materials list:
Design Memory Craft
Stamper’s Big Brush Colors:
Orange Glaze
Cobalt Blue
Magenta
Deep Scarlet Red
Cold Grey III
Sepia
Cadmium Yellow
Light Green
Cobalt Green
Gelatos Colors
Lemon Yellow
Red Cherry
Metallic Mint
Metallic Blueberry
Lime Green
Guava
Cotton Candy
Design Memory Craft Tools:
Mini Mister
Deluxe Waterbrush
Other Tools & supplies:
Hole punch
Stapler
Tags
Brads
Decorative or paper Clips
Canvas Flags (Donna Downey)
Alphabet Stamps (Scrappy Cat)
Flower Stamp (Penny Black)
Pattern Stamp (Scrappy Cat)
Owl Stamp
Chipboard shapes (Flowers)
Embossed Cardstock
Black Flock paper
Twine or shoestrings
Your inspiration pieces to pin to banner
Tonya’s notes
Mixing & Matching colors & 2 Mediums. Learn 4 WET and 4 Dry techniques
1st Flag “C” (WET)
Step 1: Create Gelato MIST. Spritz water in a measuring cup and rub color stick on the bottom of the cup. Repeat until you have the color density that you want. Pour into mister.
Step 2: Start with Lemon Yellow, spray bottom to top. Move stencil up. Repeat with RED Cherry, start in the middle and spray to top. Move stencil side to side spray yellow on edges.
Set aside to dry.
Step 3: Attach inspiration to tags and staple to flag.
Step 4: Stamp “C” at bottom of flag using India ink pen, Orange glaze
2nd Flag “E” (WET)
Step 1: Arrange Chipboard shapes on the flag. They will resist the mist.
Step 2: Spray Gelato Mist green across bottom and Blue across top.
Set aside to dry
Step 3: Use Decorative Clip to attach Inspiration to the flag
Step 4: Stamp “E” at the bottom of flag using Cobalt Blue
3rd Flag “E” (WET) watercolor stamping
Step 1: Mist Stamp and apply Guava and Bubble Gum color directly to stamp. Mist stamp again with water.
Step 2: Stamp on canvas flag. It is ok to touch up your watercolor stamp if needed.
Set aside to dry
Step 3: Clip inspiration to flag.
Step 4: Stamp “E” to bottom of the flag using Magenta
4th Flag “A” (WET) watercolor painting
Step 1: Apply Metallic Mint & Lime color to flag. Start with Lime at bottom and top, add Mint to the middle.
Step 2: Use wet paintbrush to release watercolor
Set aside to dry
Step 3: Clip Inspiration to flag (Pin with Brad?)
Step 4: Stamp “A” to the bottom of the flag using Cold GreyIII
5th Flag “R” (Stamping with India Ink)
Step 1: Ink a patterned stamp with India ink brush pens (Red, Yellow, Orange)
Step 2: Stamp pattern on to canvas
Step 3: Ink Clock stamp with brush pens (sepia)
Step 4: Attach embellishment inspiration
Step 5: Stamp letter “R” on bottom of the flag using Deep Scarlet Red
6th Flag “T” (Dry)
Step 1: Punch 3 circles out of 3 papers (Flocked, Embossed, cardboard)
Step 2: Add colors to surfaces by blending on surface.
Flocked- Rub Metallic Blueberry until blended
Embossed- Rub Lemon and Lime colors to surface then pull away some color with a baby wipe.
Step 3: Ink Owl Stamp with Light Green and Cobalt Green with India Ink. Stamp on to flag.
Step 4: Punch 3 small holes across the top of canvas and attach circles with brads.
Step 5: Stamp letter “R” on bottom of the flag using Cobalt Green
|