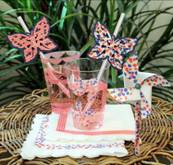
Designer Tape Picnic Ensemble
By Kazan Clark
Supplies:
Spellbinders™ Grand Calibur® machine
Spellbinders Die Cut S5-101 Wings of Hope
Spellbinders Die S4-329 Butterfly Circles
Spellbinders Die S4-289 Wonky Squares
Spellbinders Die LF-127 Scallop Squares
Spellbinders Die E8-007 Classic Edges One
Spellbinders Die S4-361 Whimsy
Elmer's Repositionable Designer Masking Tape
White, blue cardstock
Party Flexible Straws
Plastic cups
Wax Paper
Napkins
Adhesive
Craft knife
Scissors
Bamboo lollipop sticks
Brads
Instructions
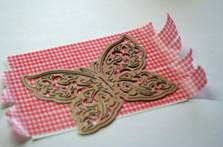
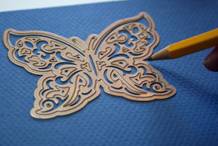
Butterfly Embellishments for Straws:
1. Adhere strips of Designer Tape to white cardstock, enough to cover entire surface of a cutout.
2. Position butterfly die template from Wings of Hope over Designer Tape (cut side
Down) then cut using the Spellbinders™ Grand Calibur® machine.
3. Take the butterfly die template and lightly trace along the outside of the die template with a pencil onto blue cardstock. Trim the butterfly shape using a pair of scissors.
4. Cut two horizontal slits in the middle of the butterfly shape, large enough to fit the width of a straw.
5. Adhere the Designer Tape cut butterfly to the blue butterfly shape leaving the middle section free of adhesive.
6. Slip a straw through the two cut slits to secure the embellishment.
Designer Tape Coasters:
1. Adhere strips of Designer Tape to white cardstock, enough to cover entire surface of a cutout.
2. Position the largest die template from Butterfly Circles #4 (#1 is the smallest), cut side down over the Designer Tape and cut coaster shape using the Grand Calibur Machine.
Cupcake Pinwheel Toppers:
1. Adhere strips of Designer Tape to white cardstock, enough to cover entire surface of a cutout.
2. Cut Pinwheels shape from Wonky Squares #6.
3. Draw a faint pencil line from corner to corner on the back of the square shape. Measure a ½” from the center of the cut square along each pencil line. Starting in each corner trim along the pencil line until the ½ ” measurement mark.
4. Gently fold over every other corner and secure in the center with a decorative brad.
5. Wrap bamboo lollipop sticks with Designer Tape
6. Secure pinwheel with an adhesive glue dot.
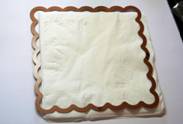
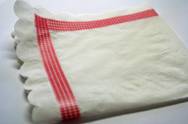
Napkins:
1. Position Scallop Squares #5 (#1 being the smallest) over folded napkin. Ensure that only two sides of the cutting edge scallop square rest on the napkin. The remainder of the die template will overlap over the folded sides of the napkin.
2. Cut using the Grand Calibur Machine
3. Carefully unfold cut napkin. Gently adhere strips of Designer Tape to the napkin and refold when complete.
Cups:
1. Adhere long strips of Designer Tape to wax paper.
2. Position the Classic Scallop Edge die template from Classic Edges One over the Designer tape and cut using the Grand Calibur machine.
3. Carefully remove the cut tape from the wax paper and adhere decorative design to the plastic cups (the little flowers were created the same way but I used the little Paisley die template from Whimsy to from each petal of the flower).
|