For project ideas and more, visit:
 www.epsoncreativezone.com
Like salt on popcorn, texture adds dimension and depth to paper
designs. The addition of texture can give your project panache.
You can take your project to the next level by adding a layer
(or two, or five!) of textural effects. There is no limit to the
number of layers you can add – it is just a matter of personal
style.
One way to add interesting depth is with scanned and photographed
textures. Objects like crumpled paper, fabric, stucco walls, cork,
and rusted metals make fantastic texturizing images. Save your
scanned or photographed image at a high resolution. The internet
is a treasure trove for texture photographs. A Google search for
“copyright-free stock photos” yields a huge list of
websites devoted to providing photos, including textures and backgrounds.
Two of our favorite sites are Stock.Xchng (http://www.sxc.hu/)
and MorgueFiles (http://www.morguefile.com/).
Pay close attention to copyright rules if you are creating paper
to sell or distribute. While a scan of gift wrap, for example,
may be fine for your own one-time personal use, distributing it
would be a violation of the copyright.
 To
use texture photographs or scans, open your texture graphic in
PSE and resize (or crop) it to the size of your paper. Remember
to change the resolution to 300 ppi to retain print quality. Select
the paper layer you would like to texturize. Create a new blank
layer over the top, then paste your texture graphic into the new
layer. Change the Blending mode. Experiment with blending modes
such as Overlay, Soft Light, Multiply or anything you like. Each
mode gives a different style to your paper. Adjust the opacity
of your texture by using the opacity slider. To
use texture photographs or scans, open your texture graphic in
PSE and resize (or crop) it to the size of your paper. Remember
to change the resolution to 300 ppi to retain print quality. Select
the paper layer you would like to texturize. Create a new blank
layer over the top, then paste your texture graphic into the new
layer. Change the Blending mode. Experiment with blending modes
such as Overlay, Soft Light, Multiply or anything you like. Each
mode gives a different style to your paper. Adjust the opacity
of your texture by using the opacity slider. 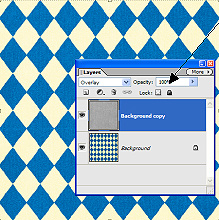 Consider
desaturating the image by pressing CTRL+SHIFT+U. Repeat the process
with another texture to create even more depth and interest. Consider
desaturating the image by pressing CTRL+SHIFT+U. Repeat the process
with another texture to create even more depth and interest.
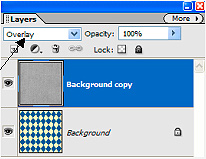
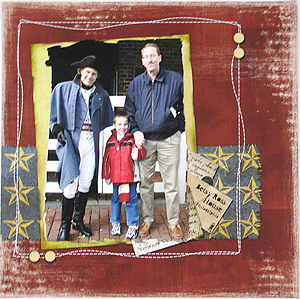
Let’s add fabric texture to our Harlequin design paper.
In this example, a pair of blue jeans was scanned. We want to
keep the texture without affecting the color of our finished paper,
so we changed the 12”x12” fabric scan to black and
white by removing the color (Enhance | Adjust Color | Remove Color.)
Next, we dragged the fabric image on top of the harlequin paper.
By changing the blending mode to “Overlay” the harlequin
paper looks just like fabric.
For our Harlequin paper, we wanted to create an aged appearance.
We began by choosing a texture image (12” square, 300 ppi)
and removing the color. Next we inverted the image (Filter | Adjustments
| Invert) and increased the contrast (Enhance | Adjust Lighting
Brightness/Contrast) 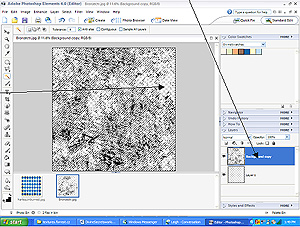 to
reduce the grey areas. At this point, you can select an area and
define a brush or continue with the overlay. To complete the overlay,
create a new (transparent) layer in your layers palette. Now copy
your texture and place it on top of the new transparent layer.
Delete the original background. At this point, you should have
a texture layer over a transparent layer. Select the texture layer. to
reduce the grey areas. At this point, you can select an area and
define a brush or continue with the overlay. To complete the overlay,
create a new (transparent) layer in your layers palette. Now copy
your texture and place it on top of the new transparent layer.
Delete the original background. At this point, you should have
a texture layer over a transparent layer. Select the texture layer.
Using the magic wand, select the white areas of your texture and
click backspace. This will delete all of the white areas, leaving
only the black texture lines. For our paper, we want the lines
to be white, so with the top layer selected, go to Enhance | Adjust
Color Adjust Hue/Saturation and move the Lightness slider all
the way to the right. You should now have white marks on a transparent
background.
Save this file as a .png file to maintain the transparency, then
move it over the top of the Harlequin paper. Adjust the opacity
to your liking. Almost-instant texture!
|