For project ideas and more, visit:
 www.epsoncrativezone.com www.epsoncrativezone.com
What do you do when you have only part of a picture that’s
good? For instance, maybe you have a GREAT picture of your kids
but the background is full of distracting objects like toys, dirty
dishes, or an ugly couch from the 70’s). Or perhaps you
want to move a person from one photograph to another? When you
use Adobe’s Photoshop Elements 4.0, it’s easier than
ever to take your subject out of a photo and drop them into a
new one, or just onto a more exciting background.
Magic Selection Brush – Open your photo, and click on the
Magic Selection Brush tool (or F on your keyboard) – it’s
hiding under the Selection Brush tool in the Toolbox. Now, just
take the brush and scribble over your subject. You don’t
need to go crazy – sometimes one line is all it takes. Once
you’re done, the computer thinks for a bit then puts a selection
around the subject (or what it thinks is the subject, based on
where you scribbled). If it doesn’t work perfectly the first
time, hold the Shift key and paint another stroke (this will add
to your selection). If it selected too much, undo (Ctrl-Z) and
scribble over a different area.
Once your subject has been selected, it’s time to have
some fun! You can copy the selection (Ctrl-C), and open up a different
image to paste (Ctrl-V) your selection into. Once you’ve
got the subject on the new background, switch to the Move tool
(V) to drag the subject into the right position. You can also
resize using the Move tool – simply hold down the Shift
key, click on a corner handle, and drag. Once you are done resizing,
press Enter to confirm.

Here we’ve decided to move “Moose” onto a different
page. We’ve scribbled on the original picture (see the red
scribble above) and then the software automatically selected ALL
of Moose – see the dotted line around him in the second
picture? He’s now all set to move onto another photo or
onto a scrapbook layout!
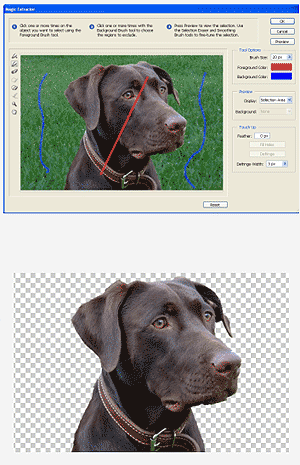
Magic Extractor - The Magic Extractor is
very similar to the Magic Selection Brush tool, except that
it extracts the subject from the background and puts it
onto a transparent background. This comes in handy when
you want to save the subject to use with different photos
at a later date.
To use the Magic Extractor tool, open your image and go
to Image | Magic Extractor. A new window will open up with
tools along the left side.
First, use the foreground brush (the top tool) to scribble
over your subject in red. Then use the background brush
(the 2nd tool from the top) to
scribble over the background in blue.
You can click on Preview to see a preview of the selection.
You may also want to Defringe the selection, which will
smooth out the pixels around the edge. Once you are finished,
press OK – your image will appear on a checkerboard
background (the checkerboard means that it is transparent)
that won’t actually show up when printed). You can
save this photo as a .png file so that it retains the transparent
background. And now you’re ready to simply use your
Move tool to click and drag your
subject onto new backgrounds. |
 |


Our friend Moose has visited the world (through the magic of
PSE)!

Here we used the Magic Extractor to select the flower from this
background, and then added it to our layout. We resized it and
rotated it so we’d have three different flowers on our layout!

|