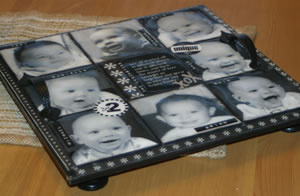
Unusual Ways to Scrapbook Pictures -
Tile Memory Tray
By Heather Lancaster
Materials
Needed
13-3501 Wood Tile Board
01-6095 Envirotex Lite 8ounce kit
42-4419 Christina Cole Black and White Designer Paper
43-5558 Christina Cole 'Bada Bing' Border Stickers
28-4002 Silver Metal Letterz
Plaid 'matte' Modge Podge
Metal Handles
metal or plastic cupboard knobs (for feet)
Label maker
Drill
Black paint
Instructions
1.
Prepare the tile board by lightly sanding then coating with a layer of black paint, then a complete layer of Modge podge. Pre drill holes for the feet of the tray and secure the feet on as tightly as possible so that the screws are flush with the top of the tray.
2.
Crop pictures, decorative papers and journalling to fit the square and border tile shapes of the board. Coat each side of the pictures and paper with a layer of modge podge. Allow to dry completely. Pictures may be laser print, inkjet or traditional photos.
3.
Apply a second layer of modge podge to the tile board surface and position pictures on top. Press firmly into place using a rubber stamp brayer if desired to ensure there are NO bubbles or wrinkles in the pictures. Attach any additional stickers, metal letters, label maker words, or embellishments and secure in place with modge podge.
4.
Apply 3 to 4 coats of modge podge, allowing each coat to dry thoroughly. Continue to ensure that no wrinkles develop in the surface.
5.
Cover the feet of the tray with tinfoil. Mix Envirotex and apply to the surface, precisely following the directions on the Envirotex box. Allow to dry overnight before proceeding.
6.
Mark the placement of the handles on top of the tray and carefully pre-drill holes using an electric drill. Attach handles to complete your project.