Close Window Print Document

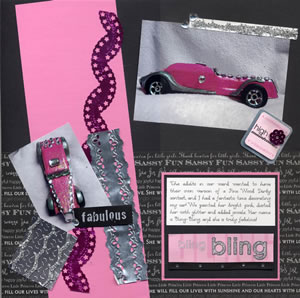
Bling Bling Fabulous
By Jennifer Davis

Materials Needed

Fiskars® Eyelet Lace Embossing Border Punch

Fiskars® Daisy Embossing Border Punch
Black, white and pink cardstock
Black word patterned paper
Pink metallic paper
Craft foil
Tire tread printed graphic
Stickers
Gemstones
Silver glitter
Adhesive
 
Instructions
Part 1: Assemble Background
1.

Cut paper:

Pink Cardstock: 4x12” and 4.75x4.25”
Black Word Patterned Paper: 6x12”
Black Cardstock: 4.5x4”
White Cardstock 4.5x.5”
Pink metallic paper: 8.5x1.5”
Silver foil: 2x6”
Tire tread graphic

2. Place black patterned paper along bottom half of page
3. Place pink cardstock at an angle on left side of page. Trim edges.
Part 2: Punch Strips
4. Punch pink metallic paper along both edges with daisy border punch.
5. Punch aluminum along both edges with eyelet lace border punch.
6. Attach both strips onto pink cardstock at angles. Use strong adhesive such as E6000 for metal.
Part 3: Create Glitter Elements & Add Photos
7. Trace the white portions of the tire tread with Tacky Glue. Sprinkle glitter generously over glue.
8. Spread glue haphazardly on small white strip. Sprinkle glitter generously.
9. Glue will take time to dry. When done, the glitter elements may be sprayed with matte sealer to help hold glitter in place.
10. Attach large photo in upper right corner at an angle. Attach smaller photo on bottom left at an angle.
11. Add tire tread embellishment below left photo. Add glitter strip above right photo.

Part 4: Finishing Touches

12. Mat black cardstock onto pink for journaling and title block.
13. Add journaling to top of block and “Bling Bling” sticker to bottom of block.
14. Add “High Maintenance” sticker to bottom right corner of larger photo.
15. Add “Fabulous” sticker to bottom right corner of smaller photo.
16. Attach gemstones with strong adhesive.
Sponsor: Fiskars®


Close Window Print Document