Epson
Computer Tip:
Mirror Images |
A good rule of thumb in layout composition is that photographic
subjects should face into the page, not look off the edge of the
paper. This draws the reader’s eye toward the center
of the scrapbook page.
But what if the group of photos that you have chosen aren’t composed appropriately? You may have a series of photos in which the subject is facing the same direction. One way to solve the problem is to create a mirror image of one or more of your photos. This trick allows you to use your favorite photos while maintaining a visually pleasing composition.
Creating mirror images is fast and easy with a graphic editing program such as Adobe Photoshop Elements 3.0 (PSE). Here’s how to create a mirror image in PSE:
1. Plan your scrapbook layout and decide which photo you will use as your focal picture and which photo(s) will be smaller, secondary photos. At least one of the smaller photos will need to face the opposite direction of the focal point photo. This will be the photo you will print as a mirror image.
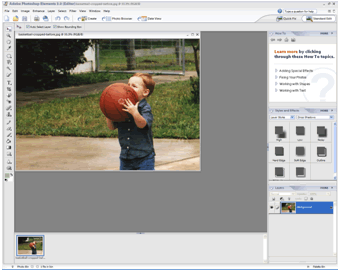
2. Open up PSE and bring in the photo you would like to mirror by scanning it. To scan the photo, select File | Import. Chose your scanner, and this will open up your scanner driver. Make sure your resolution is set to 300 dpi. Preview your photo, then use the marquee tool to draw a rectangle around the area you want to scan. Now click on “Scan”. The scan of your photo will appear in PSE, and you can close down the scanner driver window. (Note: If the photo is already stored digitally on your computer, simply select File | Open and browse your computer to locate the file). |
| This photo has the subject facing left. But my main photo in the layout is facing left, so I’d like to flip the photo so the subject is facing in order to achieve better balance |
 |
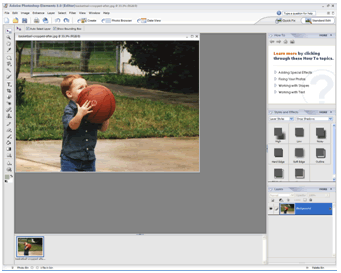
| 3. Select Image | Rotate| Flip Horizontal from the menu at the top of PSE. This flips the photo so that the subject is facing the opposite direction. (Note: flipping Vertically would turn the subject upside down, creating a reflection – like mountains reflected in a lake.)
4. Now that my photo is facing the opposite direction, I can add it to my layout by either printing the photo and scrapbooking it traditionally, or pulling it into a digital layout. |
 |
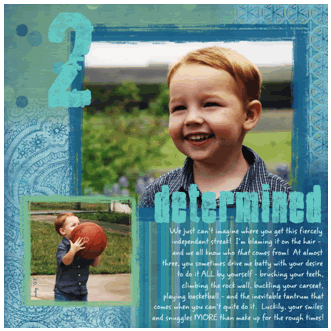
In this sample, the smaller photo needed to face right. The mirror image is now facing the appropriate direction. If I had left the photo as it was, it would draw the reader’s eye right off the page! |
 |
| Sponsor:
Epson America, Inc. |
|