Fresh Look at Paper
By Mary Ayres
|
| Materials
Needed |
 |
 |
12” x 12” textured printed papers – orange and grey
|
|
12” x 12” cardstock – yellow, orange, medium purple, dark purple, white and black |
|
Plain vellum |
|
Fiskars® Paper Tear Edgers |
|
Fiskars® Happy Halloween word punch |
|
Fiskars ®Shape Boss™ |
|
Fiskars® Embossing Stencil Sets – lettering whimsical, fall, basic shapes |
|
Fiskars® Embossing Tool |
|
Fiskars ®1/8” and ¼” circle hand punches |
|
Fiskars® Texturing Tool |
|
Fiskars® Texture Plate – fabric |
|
Other embellishments – glitter, black inkpad, 2” rolled gauze, black and yellow hemp cord, gold paper fasteners, small pieces of dry sponge, paper glue, paper scissors, 4” x 6” photo, ruler, white craft glue |
| |
| Instructions |
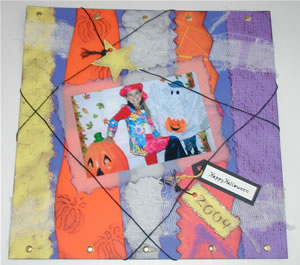
| 1. |
Tear random width strips from yellow cardstock, orange cardstock, grey print, orange print and medium purple cardstock, suing paper tear edgers (allow at least 1’ of paper along side of edgers that is to be torn, so paper can tear easily). Tear only the right edge of the yellow strip and the left edge of the purple strip. Strips should nt be so wide that they overlap the 12” x 12” page when placed side by side. |
| 2. |
Emboss stars on torn yellow strip. Emboss pumpkins on torn orange cardstock strip. Emboss fabric texture plate onto torn purple strip. Emboss large star on yellow cardstock. Cut around edge of star and punch a ¼” hole in one of the star points. Emboss year on yellow cardstock. Tear a rectangle around year, using small deckle tear edger (leave space on left side for hole). Punch a ¼” hole in left side of year tag. |
| 3. |
Antique edges and embossed details on strips, star and year tag with black ink, using a small piece of dry sponge. Dab white craft glue on torn edge of yellow strip and quickly sprinkle glitter on glue. Shake off excess glitter. Repeat for edges of star and year tag. |
| 4. |
Glue top and bottom of torn strips to page(leave open in center) Punch 1/8” holes in end of strips and attach paper fasteners. Trim top and bottom edges of gauze. |
| 5. |
Weave gauze through strips across top and bottom of page, gluing ends in back Make some cuts in gauze and pull on threads to give it a spooky look. |
| 6. |
Tear a 5” by 7” rectangle from vellum, using large deckle tear edger and antique edges with black ink. Glue photo to center of vellum rectangle. Glue vellum rectangle angled on center of page (put glue behind photo only or it will show through vellum. Wrap black hemp cord randomly over front and back or page, beginning and ending in top left corner. Insert cord ends through hole in star and tie into a knot. Trim cord ends and unravel. Insert a Piece of black cord through year tag and tie it around black cord in bottom right corner of page. To make “Happy Halloween” tag, punch words from white cardstock. Cut a rectangle around words. Glue words to black cardstock. Cut a tag shape from black cardstock around word rectangle and punch a ¼” hole in left side of tag. Insert yellow hemp cord through hole in tag and tie around black cord in bottom right corner of page. Glue black hemp cord to edges of page in back to secure it. Glue star, and year and word tags to page to secure them. |
| |
|
| Sponsor:
Fiskars® |
|