|
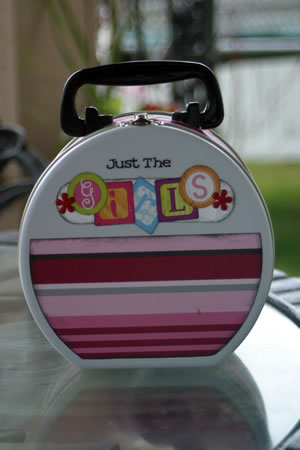
Tin Album |
| Materials
Needed |
 |
 |
20-7012 circle tin tote |
|
42-4432 Rob and Bob Studio Pink and
Berry Stripe Paper |
|
42-4433 Rob and Bob Studio Purse-onality
Paper |
|
42-1990 Rob and Bob Studio Cardstock
Sticker mini Monograms |
|
38-0942 Sizzix Crescent Tag Combo Die |
|
Sizzix Machine |
|
17-1112 Carnival Bradletz Assortment |
|
19-1035 Silent Setter |
|
42-0201 Rat-a-tat Halfabitty Alphabet
Stickers |
|
Black Ink |
|
4404098 Coluzzle Large Circle Template |
|
Coluzzle Cutting Mat & Knife |
|
Assorted Ribbons |
|
Adhesive |
| |
|
| Instructions |
| 1. |
Open the tin and trace the circular
opening onto a piece of scrap paper. Cut traced image to a slightly
smaller size and ensure that the shape fits easily inside of your
tin. Use this pattern piece for cutting the pages that will be inserted
inside of your tin album. |
| |
** Alternatively, use the sixth channel
from the outside of the Coluzzle large circle template to cut perfect
fitting circles. |
| 2. |
Fold a piece of black 8 ½”
x 11” cardstock in half and place the pattern that you have
made so that the flat edge sits on the fold. If you are using the
Coluzzle template, place the template so that appx. 3/8” of
the 6th channel sits off the folded edge of paper. |
| 3. |
Cut 4 sets of circles on the fold. |
| 4. |
Set all of the pages in an even stack
and use the Silent Setter to punch two holes on the rounded edge
of each set. |
| 5. |
Use small scraps of ribbon to tie together
each set of pages. |
| 6. |
Cut one piece of each patterned
paper in half. Fold each piece in half again vertically and cut
4 sets of half circles to adhere to the base pages. Use your template
or pattern again, placing the flat edge of the template on the
fold. |
| 7. |
Ink the edges of the cut patterned
papers and adhere to the base pages. |
| 8. |
Using the Sizzix machine and medium
tag on the Tag die, cut 5 ‘on the fold’ tags. To do
so, fold a tag width strip of paper in half, creasing the fold
line with a bone folder. Place the folded edge of the paper towards
the flat end of the tag shape. Cover all of the tag shape except
for the cut line on the flat end. |
| 9. |
Ink the edges of the double ended
tags. |
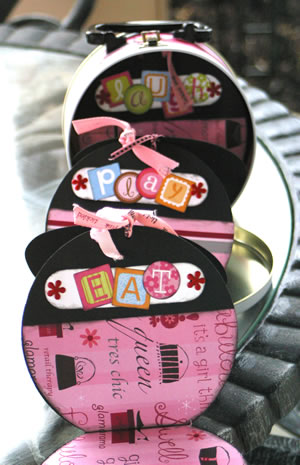
| 10. |
Ink the edges of the Mini Monogram
letters to make titles for each of your pages. We wrote ‘laugh’,
‘play’, ‘eat’, and ‘shop’
for our girl friends album. |
| 11. |
Attach Red Flower Bradletz through
the holes on each end of the tag titles and then adhere in place
on your pages. |
| 12. |
Attach your pages inside of the album
by using a glue gun. Tie a long length of ribbon in the holes
on the first page and adhere it to the bottom of the tin. Ensure
that your ribbon allows enough room to easily open the accordion
pages of your album. Try using a blank monogram to hide the section
of ribbon that you glue to the tin. |
| Outer Tin
|
| 1. |
Using the same method as step 6 above,
cut a half sheet of patterned paper and adhere it to the bottom
front of the tin. A Xyron provides a nice even coat of adhesive!
|
| 2. |
Create a title for your tin using
the same method as steps 8-11 above. Adhere the title above the
patterned paper on your tin.
|
| 3. |
Cut two, 2” x 10” strips
of patterned paper. These strips will wrap around the sides of
your tin, joining in the top and bottom center of the tin. Ink
the edges of both strips.
|
| 4. |
Create a pattern for the top of the
tin, so that the paper will wrap easily around the handle. Use
a 2” strip of printer paper. Cut a slot into the paper and
then place it on the handle. Use a craft knife to trim away any
excess.
|
| 5. |
Using the pattern you have made,
cut the handle slots into the two strips of patterned paper. Run
the strips through a Xyron and then carefully adhere them to the
sides of the tin. If desired, cut a tiny strip of paper to cover
the joint between the handles of the tin. A monogram or blank
monogram shape looks nice centered on this spot too!
|
| 6. |
Using Halfabitties, complete your
title or add a subtitle to your tin! |
| Sponsor:
Provo Craft |