Adding Dimension to Die-Cuts |
| Adding dimension to your
die-cuts is easy, fun, and the enhanced results are always worth
it!
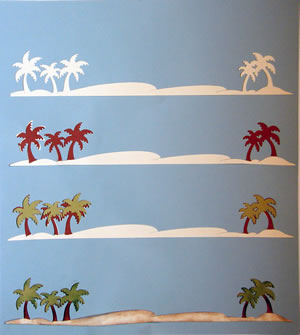
Step 1: Scrap Daddy
began by cutting a “base” die-cut in ivory cardstock
using the Palm Tree 12” Border Strip by Sizzix. The “base”
die-cut is the one that the other die-cuts will be placed onto.
Step 2: A second
Palm Tree Border Strip is cut using brown cardstock. The only
part of the die-cut that is needed is the “trunks”
of the trees to represent the brown palm tree trunks. Cut the
brown cardstock “trunks” out of the design and glue
them on top of the “trunks” on the Die-cut “base”
(ivory cardstock).
Step 3: A third
Palm Tree Border Strip is cut using green cardstock. The only
part of the die-cut that is needed is the “palm tree leafy
tops”. Cut the “leafy tops” from the design
and glue them on top of the “leafy tops” onto the
Die-cut base (ivory cardstock). You should now have ivory “sand”,
brown “tree trunks”, and green “leafy tree tops”.
This process is also known as “Layering Die-cuts”.
Step 4: Chalk the
edges of the ivory cardstock with brown chalk to add a “shadowed”
effect. Chalk the edges of the brown “tree trunks”
with a darker brown chalk or add a slight amount of black chalk
to darken your brown chalk. Chalk the edges of the “leafy
tree tops” with a darker shade of green chalk.
By layering and chalking die-cuts this will not only add dimension
to your Die-cuts but it will also make them come to life.
|
 |
| Sponsor:
ScrapDaddy |
|