|
Stressless Scrapbooking
by Stacy Julian |
To keep your scrapbooking projects simple,
follow these general guidelines:
1.
Use limited product
2.
Use just a few of your photos [enlarge some of your favorite for
emphasis]
3.
Invest in versatile tools and generic/versatile product 6x6
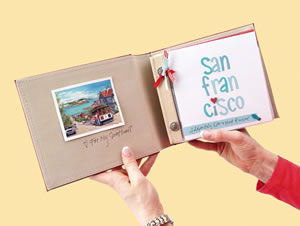
Vacation Album
Do you have any idea how good it feels to create a small travel
scrapbook the day you get your pictures back! You can do this
– you have the time. All you need to do is keep it simple
and follow these easy instructions. Stacy’s album is all
about a weekend trip to San Francisco, but with these step by
step instructions, you can customize your album to any destination!
|
| Materials
Needed |
 |
 |
1 6x6 album with 10 page protectors
|
 |
2 postcards from your trip |
 |
7 of your most favorite vacation photos
enlarged to 5x7 |
 |
8-10 additional snapshots – make
sure everyone you traveled with is pictured here |
 |
die cut letters, photo anchors and bookplate |
 |
25 mini brads |
 |
5 sheets of 12x12” cardstock for
album pages |
 |
1 sheet pattern paper |
 |
scraps of cardstock |
| |
|
| |
| Instructions |
| 1. |
Cut the five sheets of cardstock
into 20 6x6” squares and set aside. These are the pages
that go into your album.
|
| 2. |
Pull two colors from your postcards
that you want to use throughout your album
|
| 3. |
Find cardstock scraps in these two
colors
|
| 4. |
Select one piece of 12x12”
pattern paper that coordinates with your color scheme and cut
it in half [6x12”]
|
| 5. |
Using cardstock scraps, punch out
the letters in the name of your destination and arrange on the
title page. Use a photo anchor and brad to secure a strip of cardstock
for a subtitle [optional]
|
| 6. |
Trim your 5x7” inch photos
down to 5x5” and adhere one to the left side of each two-page
spread. Use a photo anchor and brad on the lower right.
|
| 7. |
Cut the half sheet of pattern paper
into one inch strips [each will be1x6”]
|
| 8. |
Adhere one strip of pattern paper
to the top, right side of each two-page spread. Using two mini
brads, secure a bookplate die-cut about 1/2 inch from the right
edge of the page, overlapping the pattern paper strip.
|
| 9. |
Hand journal detailed memories corresponding
to each photo directly opposite it on the right-hand side of each
two-page spread.
|
| 10. |
Label the photo and journaling in
the bookplate.
|
| 11. |
Trim and adhere 8-10 snapshots to
the last three pages of your album – be sure to sign off
on the very last page!
|
| 12. |
Trim one of your postcards and adhere
to the cover of your album. Accent with metal photo corners [optional]
|
| 13. |
Adhere the other postcard to the
inside front cover of your album, directly across from the title
page. |
| Note:
See Gallery section for inside album page ideas. |
| Sponsor:
Simple Scrapbooks
magazine |