Epson Computer Tip: PhotoShop Elements Quick
Scrapbook Technique - Colorizing Photos
|
| Here’s a neat technique!
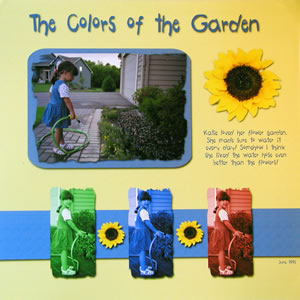
Call this the Andy Warhol effect, or colorizing photos. It’s
really easy to do with PSE 3.0. |
 |
| 1. |
Choose Edit and Enhance
Photos from the opening screen |
| 2. |
Choose the photo you want to edit
by clicking on File | Open and find the photo
in your system.
|
| 3. |
If it’s in color, turn your
photo into B/W. Click on Enhance | Adjust Color | Remove
Color.
|
| 4. |
To colorize, click on Enhance
| Adjust Color | Adjust Hue/Saturation. This brings up
the Hue/Saturation menu.
|
| 5. |
Click on the Colorize
box.
|
| 6. |
Now adjust the Hue slider until
you get the colors you like. Either type in numbers, or play with
the hue slider bar.
|
| 7. |
For Red
try a Hue of “0”
|
| 8. |
The Saturation of “50” is about mid
range. This affects the color’s intensity.
|
| 9. |
For Green,
try a Hue of “ 131”
|
| 10. |
For Blue
, try “223”
|
| 11. |
Save a photo in each color you want, then print.
How easy is this? |
| |
Equipment used:
Epson R1800 |
| Sponsor:
Epson America |
|