Close this window to return to series
600 project listing |
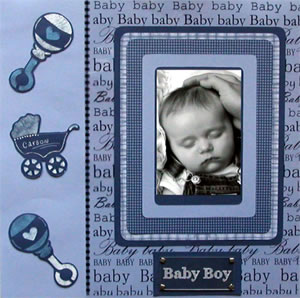
Little Boy Blue
By Diana Sewnsen |
| Materials
Needed |
 |
| |
 |
Fiskars ScrapBoss |
| |
 |
Fiskars Scrap Boss Stencil – (Theme)
Baby |
| |
|
Fiskars Shape Cutter |
| |
|
Fiskars Shape Cutter Super Size templates
- Rectangles |
| |
|
Fiskars 12” Paper Trimmer |
| |
|
Fiskars Cutting Mat |
| |
|
Fiskars Photo tape |
| |
|
Fiskars Hand held punch - 1/16”
circle |
| |
|
Cardstock – Periwinkle by National
Cardstock |
| |
|
Printed cardstock- Navy Splatter, Navy
Gingham and Navy Plaid by Bo Bunny Press |
| |
|
Karen Russell Narratives “Baby”
by Creative Imaginations |
| |
|
Colorbox pigment ink - Frost white and
Sky Blue by Clearsnap Inc |
| |
|
Stencil daubers by Plaid Enterprises |
| |
|
Baby Boy Chrystalz by Scrap Pagerz |
| |
|
Pewter mini square brads by Making Memories |
| |
|
Mini Pop Dots by All Night Media |
| |
|
White Gel Pen by American Crafts |
| |
|
Low tack tape |
| |
|
Wax paper optional |
| |
| Instructions |
| |
1. |
Using the ScrapBoss and the Themed Baby stencil
emboss two baby rattles and one baby buggy onto Navy Splatter
cardstock. The Splatter side of the cardstock should face up.
Tape the edges of your cardstock to make sure it stays in place
while embossing. (See diagram A)Tip; if you rub the back of the
cardstock with wax paper the stylus will glide more easily when
embossing.
|
| |
2. |
Once you have embossed all of the designs turn
the stencil over and position it over the design for coloring.
|
| |
3. |
To Color tap the stencil dauber onto the inkpad
then tap it lightly onto the design. The ink is wet so tap lightly
and be careful not to saturate the embossed area. (See diagram
B) |
| |
4. |
Color all designs as shown in the page example.
Once all areas are colored set the embossed design aside to dry.
|
| |
5. |
Trim 3 3/4” off the left side of the Narratives
“Baby” sheet. Center and adhere it to a 12”
x 12” sheet of Periwinkle cardstock. See page example. Tip;
If you adhere it in the middle where the adhesive could be hidden
beneath the photo frame it will look nicer.
|
| |
6. |
Using the Shape Cutter and the Super Sized Rectangle
templates cut the following. Navy Splatter outside of the #4 template,
(NOTE: Position the template in the corner of the page so that
you have enough room to cut the last piece out of the same page,
see diagram) Navy Plaid outside of the #3 template, Navy Gingham
the outside of #2 template, Periwinkle inside of the #4 template
and Navy Spatter inside of the #2 template. |
| |
7. |
Layer and adhere the frames together as shown
in the page example. |
| |
8. |
Center and adhere the photo to the photo frame
then center and adhere the frame to the page as shown in page
example. |
| |
9. |
To create the Title box cut a 3 1/2” x 1
3/4” piece of Navy blue cardstock. Center the Baby Boy Chrystalz
onto the cardstock and adhere with Pewter mini square brads. Center
and adhere the title box under the photo frame. |
| |
10. |
Using a Razor Knife or Micro-tip scissors cut
out the embossed designs leaving a slight border. |
| |
11. |
Adhere the cut outs to the left side of the page
with Mini Pop Dots. (See page example) |
| |
12. |
Complete page by putting the Baby’s name
on the baby buggy with a white gel pen. |
| |
|
|
| Sponsor:
Fiskars |