Close this window to return to series
600 project listing |
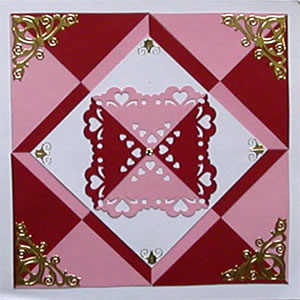
Valentine Illusion
By Diana Sewnsen |
| Materials
Needed |
 |
| |
 |
Fiskars 12” Euro Paper Trimmer
|
| |
 |
Fiskars Border Punch – Hearts |
| |
|
Fiskars 3 in 1 Corner Punch –
Hearts |
| |
|
Fiskars Photo Stickers |
| |
|
Fiskars Glue Pen |
| |
|
Victorian Borders stickers AP150G |
| |
|
Gold by Stampendous |
| |
|
Cardstock – Dark Pretty Pink,
Light Heritage White and Medium Berry Red by WorldWin |
| |
| Instructions |
| |
1. |
Cut a piece of Light Heritage White cardstock
5 1/2” x 11”. Fold in half to form a card. |
| |
2. |
Cut four 1 3/4” squares out of Medium Berry
Red cardstock and four 1 3/4” squares out of Dark Pretty
Pink cardstock. |
| |
3. |
Cut all squares in half corner-to-corner to create
8 triangles of each color. (See diagram A) (tip; You can draw
a line from corner to corner as in Diagram E or you can cut the
squares in half using a ruler and razor knife.)
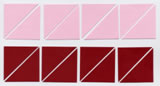
Diagram A
|
| |
4. |
Adhere four triangles (2 of each color) together
to form a square. (see diagram B)

Diagram B
|
| |
5. |
Repeat step 4 to create a total of four squares.
|
| |
6. |
Adhere the squares together as shown in diagram
C. (tip; no matter how hard you try it is almost impossible to
cut the triangles exact every time. After you get the squares
adhered together take a moment to even up the sides if need be.)

Diagram C
|
| |
7. |
Cut a 3”square of white cardstock. Center
and adhere the square onto the card front of the card as shown
in diagram D.

Diagram D
|
| |
8. |
8. Cut a 2” square out of Dark Pretty Pink
cardstock. On the back draw lines from corner to corner. (see
diagram E)

Diagram E
|
| |
9. |
Punch one of the corners with no line using the
3 in 1 Heart punch (five heart design) |
| |
10. |
Rotate the square 90 degrees and punch the opposite
corner. (see diagram F)

Diagram F
|
| |
11. |
Cut the square into two triangles using the line
you drew in step 7. |
| |
12. |
Place one of the triangles into the heart border
punch. Align the tip of the triangle with the center grid mark
on the border punch and punch. (see diagram G)
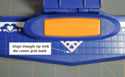
Diagram G
|
| |
13. |
Repeat step 11 with the other pink triangle. |
| |
14. |
Repeat steps 8-11 using Medium Berry Red cardstock.
|
| |
15. |
With right sides down, lay the punched triangles
together and adhere together with clear photo stickers. (see diagram
H)

Diagram H
|
| |
16. |
Center and adhere punched design onto the card.
Apply stickers to the card front as show |
| |
|
|
| Sponsor:
Fiskars |