Close this window to return to series
600 project listing |
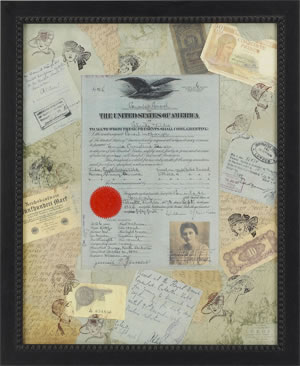
Framed Document |
| Materials
Needed |
 |
| |
 |
Keepsake document of choice |
| |
 |
Frame |
| |
|
Frame hanging hardware |
| |
|
Pre-cut mat board or poster board |
| |
|
Papers/Materials: (choose papers that
complement, not sharply contrast the document) |
| |
|
- Green Canvas Paper (Hot Off The Press) |
| |
|
- Green Map Paper (Hot Off The Press) |
| |
|
- Days Gone By Paper (Karen Foster
Design) |
| |
|
Ephemera scanned and printed from “The
Ephemera Book” (Design Originals) |
| |
|
Women in Fancy Hats stamps (Hero Arts) |
| |
|
Sepia Black and Chestnut inks (Color
Box) |
| |
|
1” Glue Lines™ |
| |
|
Memory Book Glue Dots® |
| |
|
X-acto knife |
| |
|
Ruler, 18”-24” |
| |
| Instructions |
| |
1. |
Measure document to determine frame and mat board
size. To allow extra space to feature papers and stamping, go
to a larger frame size than required. (For example, if your document
measures 10x12”, instead of using a 10x12” mat board
and frame, try using a 16x20”) |
| |
2. |
If your budget does not allow you to purchase pre-cut
mat board, try cutting your own using budget-friendly poster board
and this simple cutting formula:
- Measure frame opening from back side of frame and cut poster board
to fit
- Subtract width of cut poster board from width of document and
divide by 2 to get the side measurements
- Subtract length of cut poster board from length of document and
divide by 2 to get the top and bottom measurements
- Mark off sides, top and bottom measurements on poster board and
cut opening for the document |
| |
3. |
Tear Green Canvas paper and pre-position into place,
overlapping outer mat board edge and inside cut opening |
| |
4. |
Tear Days Gone By paper and pre-position into place,
overlapping outer mat board edge and inside cut opening |
| |
5. |
Tear Green Map paper and pre-position into place,
overlapping outer mat board edge and inside cut opening |
| |
6. |
If you like the layout, use Memory Book Glue Dots,
to adhere papers in place |
| |
7. |
After papers are mounted to mat board, turn mat board
over and using an x-acto knife and ruler, trim away excess paper
around outer edge of mat board and inside cut opening |
| |
8. |
Cut desired ephemera and randomly adhere to mat board
using Memory Book Glue Dots |
| |
9. |
Using stamps and inks, randomly stamp over papers
and ephemera |
| |
10. |
Turn mat board over to unfinished side and place 1”
Glue Lines on corners of mat board opening |
| |
11. |
Place document facing down over opening and press
onto Glue Lines |
| |
12. |
Place matted document into frame and attach hanging
hardware |
| |
|
|
| Sponsor:
Glue Dots |