Close this window to return to series
600 project listing |
The
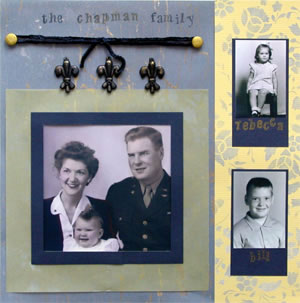
Chapman Family
By Lynn B. Krucke |
| Materials
Needed |
 |
| |
 |
12 x 12 paper- “Cottage Crackle-navy” (Me
and My Big Ideas) |
| |
 |
Blue and yellow cardstock (Bazzill
Basics) |
| |
|
Vellum- yellow |
| |
|
One-Step background stencil “Chintz” (Delta) |
| |
|
Decorating chalks- “glimmer” (Craf-T
Products) |
| |
|
Chalk applicators (Craf-T Products) |
| |
|
PearlEx stamp pads- indigo, gold
(Jacquard Products) |
| |
|
Alphabet stamp set (Hero Arts) |
| |
|
Spray bottle with water |
| |
|
Sculpey Flexible Push Mold- “sconce
décor” (Polyform) |
| |
|
Premo polymer clay- ultramarine,
orange (Polyform) |
| |
|
Oven thermometer |
| |
|
Index cards |
| |
|
Scissors |
| |
|
Sculpey Super Slicer (Polyform) |
| |
|
3-D mounts (3M) |
| |
|
Chenille fiber- French navy (On
the Surface) |
| |
|
Paper trimmer |
| |
|
Photographs (or color copies) |
| |
|
Double sided tape pen (3M) |
| |
| Instructions |
| |
1. |
Cut a 3.5 inch strip from the piece of yellow
cardstock. |
| |
2. |
Use the chalk applicator to apply blue glimmer chalk
through the background stencil. The texture of the Bazzill Basics
cardstock adds to the authentic fabric look of the “chintz”. |
| |
3. |
Mix ¼ package of ultramarine polymer clay
with a pea-sized ball of orange clay. Mixing blue with its complementary
color tones down (de-saturates) the ultramarine. |
| |
4. |
Spritz the mold lightly with water. Press
blue clay into desired area of mold. Trim away excess if needed. |
| |
5. |
Before unmolding the embellishment, use a fingertip
to gently nudge the clay away from the edges of the mold. This
will ensure that the finished piece has smooth, neat edges. |
| |
6. |
Flex the mold and remove the embellishment. Make
more as needed. Highlight the molded embellishments with a small
amount of gold glimmer chalk. Transfer embellishments to an index
card. |
| |
7. |
Bake the embellishments at 275 degrees F for thirty
minutes. Always
use an oven thermometer when baking polymer clay! |
| |
8. |
Mat smaller photos with dark blue cardstock. Stamp
names with gold Pearl-Ex ink. |
| |
9. |
Mat larger photo with yellow vellum and dark blue
cardstock. |
| |
10. |
Mount “chintz” strip along right edge
of 12x12 page. Add small photos. |
| |
11. |
Mount larger photo in lower left corner. |
| |
12. |
Adhere three fleur-de-lis embellishments above large
photo. |
| |
13. |
Use gold Pearl-Ex ink to color 3-D mounts. Allow to dry (you
may use heat gun to speed drying, but be careful not to soften
plastic) |
| |
14. |
Adhere 3-D mounts at top of page and tie on chenille
fiber. |
| |
15. |
Stamp title above fibers with indigo Pearl Ex ink. |
| |
|
|
| Sponsor:
Polyform,
3M and Craf-T Products |