Close this window to return to series
600 project listing |
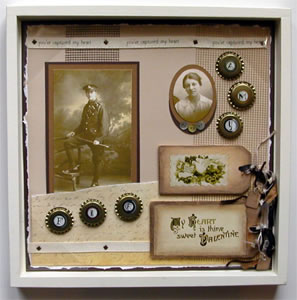
Shadow
Box Page
By Julie McGuffee
|
| Materials
Needed |
 |
| |
 |
Vintage Alphabet Rub Ons – Royal
and Langnickel |
| |
 |
Valentine Collage Rub Ons – Royal
and Langnickel |
| |
|
Soft Pastels – Royal and Langnickel |
| |
|
Soft Stencil Brush - Royal and Langnickel |
| |
|
12” x 12 “ Shadow Box
Frame - Petals & Possibilities |
| |
|
Fiskars® Frame Templates – Ovals |
| |
|
Fiskars® Shape Cutter |
| |
|
Fiskars® Self Healing Cutting
Mat |
| |
|
Fiskars® Euro Trimmer |
| |
|
Fiskars® 1/16 th Hole Hand Punch |
| |
|
12” x 12” Dark Brown
Cardstock - DCWV |
| |
|
8” x 8” Tan Cardstock
- DCWV |
| |
|
12” x 12” Beige – DCWV |
| |
|
12” x 12” Vintage Patterned
Paper |
| |
|
Off White Cardstock |
| |
|
Bottle Caps – Design Originals |
| |
|
Magic Mesh Roll – Pewter |
| |
|
Magic Mesh Sheet - Gold |
| |
|
24” Twill – HOTP |
| |
|
Pearl Buttons – Wimpole Street |
| |
|
Square Pewter Brads – Making
Memories |
| |
|
Wooden Tags – Lara’s
Crafts |
| |
|
3 M Adhesive – new Large photo
corners, heavy duty mounting tape, tacky adhesive, stick adhesive
and ? |
| |
Note: When choosing papers for
your layout, look for colors and styles that complement the photograph
and theme and for solid colors to coordinate with the background
paper. |
| Instructions |
| |
1. |
Trim about ¼” from two adjacent sides
of the dark brown background cardstock. This will ensure it fits
snugly inside the shadow box frame. |
| |
2. |
Tear about ¼” from each side of the
Beige cardstock. |
| |
3. |
Cut a tan mat about ½” longer and wider than the
photograph. Cut a second mat from dark brown paper about ¾” longer
and wider then the photograph. |
| |
4. |
Use the shape cutter and template to cut an oval
photograph. Use the next larger size oval to cut a tan and a dark
brown oval mat. |
| |
5. |
Tear a strip of patterned paper about 3” – 5” wide
for the bottom of the page. |
| |
6. |
Rub the appropriate alphabet letters onto the bottle
caps. Flatten first if desired by tapping lightly around the rounded
edge with a hammer or mallet. Short names can be spelled out,
or use the person’s initials. |
| |
7. |
Following the directions on the packaging, rub the “My
Heart….” saying onto a scrap of off white cardstock.
Tear the cardstock around the saying so it is sized to fit onto
a wooden tag. Adhere to the center of the tag with stick glue. |
| |
8. |
Rub one of the rectangle designs onto a second wood tag. (The
tags can be the same, or different sizes.) |
| |
9. |
Color around the edges of each tag with the dark brown pastel.
Start with a small amount of color. Brush the color into the
wood and over the paper and the rub-ons. Add a little rust color
and blend. Keep adding color and blending with the stencil brush
until the desired effect is achieved. The edges should be darker
than the center. Rub over surface with a paper towel to remove
excess chalk dust. |
| |
10. |
Cut an assortment of coordinating fibers then thread through
the hole in each tag. Option: Chalk paper jewelry
tags, including the string and add to the strands of fibers. |
| |
11. |
Adhere a 12” length of pewter magic mesh to the left
of the beige cardstock about 2” from the edge. Trim as
needed. |
| |
12. |
Adhere the photograph to the tan mat then the dark brown mat,
then adhere to the left side of the page, centering over the
strip of mesh. |
| |
13. |
Adhere the torn piece of printed paper across the bottom of
the beige cardstock with the edges aligned. It will cover the
bottom of the photograph. |
| |
14. |
Place a 4” wide strip of gold mesh on the right
with edge aligned inside the torn edge. |
| |
15. |
Attach a 12” strip of twill along the top and
bottom edges of the page with the square brads. |
| |
16. |
Adhere the oval photograph to the tan oval then the
dark brown oval. Offset the dark brown oval so that ¼” shows
below the edge of the tan. Adhere to the page, centering over
the edge of the mesh. Adhere three pearl buttons at the bottom
of the mat with tacky adhesive. |
| |
17. |
Fold or roll a piece of mounting tape for each bottle cap then
use to adhere the bottle caps to the page. |
| |
18. |
Adhere the wooden tags with mounting tape or tack adhesive. |
| |
19. |
Attach a large photo corner to each corner of the
dark brown cardstock. Use these photo corners to hold the layout
in place while it is being displayed. It can be removed later and
placed in an album and a different layout put in its place. |