Close this window to return to series
600 project listing |
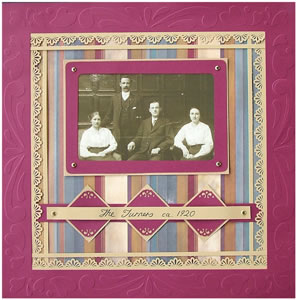
Heritage
By Julie McGuffee for
Fiskars
|
| Materials
Needed |
 |
| |
 |
Fiskars® 12” Euro Trimmer |
| |
 |
Fiskars® Border Punch – Sunburst |
| |
|
Fiskars® 3in1 Corner Punch – Lace |
| |
|
Fiskars® Scrapboss with Stencil & Stylus |
| |
|
Fiskars® Frame Templates – Rectangles |
| |
|
Fiskars® Shape Cutter |
| |
|
Fiskars® Self Healing Cutting
Mat |
| |
|
Fiskars® Euro Trimmer |
| |
|
Fiskars® 1/16 th Hole Hand Punch |
| |
|
12” x 12” Burgundy Cardstock,
National Cardstock |
| |
|
12” x 12” Tan Cardstock,
National Cardstock |
| |
|
12” x 12” Patterned
background paper, 7-Gypsies |
| |
|
6 Brass Mini Brads – American
Traditional Designs |
| |
|
Adhesive |
| |
Note: When choosing papers for
your layout, look for colors and styles that complement the photograph
and theme and for solid colors to coordinate with the background
paper. |
| Instructions |
| |
1. |
Use the Scrapboss stencil to dry emboss the border around the
edge of the burgundy cardstock. There are two border patterns
on the stencil. Dry emboss two sides, then turn the paper 180
degrees to dry emboss the remaining two sides with the same design.
To help the stylus glide more smoothly, rub the area first with
wax paper. When dry embossing a design, always use the largest
end of the stylus first, and then go over the pattern again with
a smaller tip to create a deeper embossed design. |
| |
2. |
Starting 1 ¼” from the edge of the border and
1 ¼” from the top, cut a square from the center
of the burgundy stock with the paper trimmer. |
| |
3. |
Cut a 1 ½” and a ¾” wide
strip from the edge of the burgundy cardstock. Cut three, 1 ½” squares
from the 1 ½” wide strip. Use the 3 in 1 corner
punch to punch a design in opposite corners of each square. |
| |
4. |
Cut a strip of tan cardstock 1 ¾” wide
then into three, 1 ¾” squares. |
| |
5. |
Using the Rectangle frame templates and the Shape
Cutter, cut a frame for the photograph ½” – 1” wide
from the remaining piece of Burgundy cardstock. Cut the inside
opening of the frame first the same size as the photograph, then
cut the outside of the frame with a larger size template. By
using either the inside or the outside of the frame rectangles
there is a range of 8 graduating sizes of rectangles. |
| |
6. |
Cut four, 1 ½” wide strips of tan cardstock.
Starting about ½” from the end of the strip, punch
the Sunburst design along one edge of all four strips. The narrow
strip that forms above the pattern can be cut away or left in place. |
| |
7. |
Referring to the
photograph, assemble the layout as follows:
- Adhere the photograph then the burgundy frame to tan cardstock.
Cut around the outside edge of the frame leaving a narrow border,
1/8” – ¼” wide. Then use the hand
punch to make a hole at each corner. Insert brads.
- Adhere the burgundy squares to the tan squares, then starting
at the center adhere one square to the ¾” burgundy
strip and the remaining squares on either side.
- Cut a strip of tan paper about ½” wide for
the title. Titles can be handwritten rubber stamped, or printed
on the computer. Note: Titles should be printed
on the computer first then cut. Trim the ends of the strip
to desired length then adhere to the top of the squares. Punch
a hole at each end then insert brads.
- You have now completed all three elements for this layout.
Adhere the border frame to the background paper, and then adhere
the framed photograph and title bar.
|
| |
Option: |
Wrap fiber around the frame
using the brads at each corner to anchor in place. |
| |
|
|
| Sponsored
by: Fiskars |