Close this window to return to series
600 project listing |
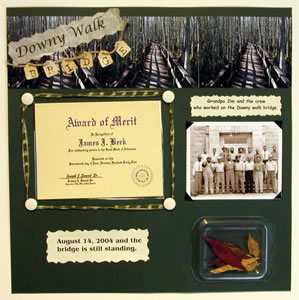
Old and New In Harmony
By Stephanie Hopkins for 3M |
| Materials
Needed |
 |
| |
 |
Adhesives: Scotch® Scrapbook
double sided permanent tape, single sided clear tape, single
sided clear tape, tape runner, glue stick and photo corners (black) |
| |
 |
12 x 12 colored paper |
| |
|
Ink Jet photo paper |
| |
|
Scotch® Keepsake Keeper 2-3/4” x
3-3/4” |
| |
|
Cloth ribbon |
| |
|
Hemp twine |
| |
|
Mulberry paper – tan |
| |
|
Parchment paper – tan |
| |
|
Lettered tags |
| |
|
12 x 12 Page protector |
| |
|
Decorative scissors |
| |
| Instructions |
| |
1. |
Pick a base page color to correspond to your
event. To bring old and new together take a photo of the site
today to go along with your old black and white photo of the
site or event. Make three prints of the current photo and place ½” down
from the top of the page using the Scotch® Craft Glue Stick. |
| |
2. |
Using your ink jet printer and mulberry paper
print the name of the location of the site. Cut using a decorative
scissor of your choice and adhere to the upper left-hand corner
of the page and on top of the photo border using a Scotch® Tape
Runner. |
| |
3. |
Using the lettered tags and hemp twine thread
the twine through the tags to spell out an appropriate description
of the site such as “bridge”. Place on top of the
photo border just below the mulberry label. |
| |
4. |
Create a custom pocket for your certificate
using plastic from a page protector and Scotch® Double Stick
Tape. Place the certificate on the plastic sheet and apply the
tape about a 1/8” to ¼” away from the certificate
at the two sides and bottom. Cut the plastic along side the outside
of the tape and across the top even with the top of the certificate. |
| |
5. |
Determine were you would like the certificate
on the page and draw a guide line even with the bottom. Turn
the plastic over so the tape side is on your work surface. |
| |
6. |
Place the certificate on the plastic to be
a guide for you to crease the plastic along three sides. The
tighter the crease the easier it is to install in the scrapbook.
Trim the small square of excess plastic and tape from the two
bottom corners. Remove the tape liner along the bottom flap and
tack the two bottom corners of the side flaps to the bottom flap.
Turn the pocket over and install the bottom of the pocket along
your guide line. Then remove the tape liner along the two sides
and attach the sides of the pocket. |
| |
7. |
Using the Scotch® Decorative Tie Downs
place one near each corner of the certificate. These will help
to protect your certificate from crushing. |
| |
8. |
Using ribbon loop it around the first tie down
and tuck in the end under the tie down gripper. Go from the first
tie down and loop around the next three using only enough tension
to get the ribbon into the gripper of the tie down. Loop twice
around the final tie down and cut and tuck the end under the
gripper. |
| |
9. |
Using either an original or copy of the black
and white photo of the event or place, position Scotch® Photo
Corners on each of the four corners of the photo before placing
the photo on the page. |
| |
10. |
Using the Scotch® Keepsake Keeper place
leaves or other memorabilia from the site in the keeper. Use
Scotch® Scrapbooking tape to seal the edge of the keeper
and to help keep potentially harmful material from reaching your
photos. Remove the liner from the back of the Keepsake Keeper
and adhere to the page. |
| |
11. |
Use the tan parchment paper to create labels
that include a brief story line to go along with your photo and
certificate. Cut using the decorative scissors and apply using
your Scotch® Tape Runner. |
| |
|
|
| Sponsor:
3M |