Close this window to return to series
500 project listing |
The
Embossing Boss!
by Julie McGuffee for Fiskars |
Dry embossing is a simple way to add
elegance and texture to cardstock, vellum, foil, mesh and metals |
| Materials
Needed |
 |
| |
 |
Paper:
12'" x 12" Cardstock - Off White and Light Blue
Small pieces of Medium blue |
| |
|
Tools:
Scrapboss Dry Embossing system - Fiskars
Scrapboss 12" x 12" Baby Theme Stencil - Fiskars
12" Euro Trimmer - Fiskars
Nested Ovals Template - Fiskars
Shape Cutter - Fiskars
Craft Mat - Fiskars
Micro tip Scissors - Fiskars |
| |
|
Embellishments:
Metal Title - Die Cuts With a View
2 silver Brads - American Traditionals |
| |
|
Adhesives:
Photo Mounting Squares, Foam Mounting Tape, Double Sided Photo Tape
- 3M |
| |
| Instructions |
| |
1. |
Emboss border around sides of 12" x 12"
background paper. Emboss two sides, then turn paper to emboss pattern
on opposite sides. |
| |
2. |
Trim 3" from top and side of light blue paper
then adhere to the center of the embossed background paper. |
| |
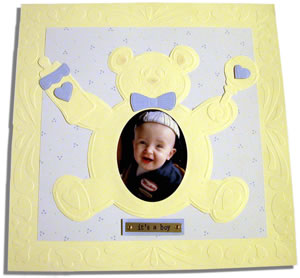
3. |
Emboss the bear, rattle and bottle onto off white
cardstock then cut out. Emboss bow, hearts and bottle neck onto
medium blue paper. Cut around shapes. |
| |
4. |
Cut an oval from the body of the bear then adhere
the photograph behind the opening. Adhere to the center of the
page. Adhere bottle and rattle as shown. Adhere additional medium
blue elements of design with foam tap for additional dimension.
|
| |
|
This page is for the photograph of a little boy,
so the bow was cut from the top of the bear's head and placed
under the chin as a bow tie. Lightly chalk raised areas if desired.
Note: Two stylus
are provided with the Scrapboss. For a deeper emboss, emboss design
with the large end first then re-emboss with a smaller tip. |
| Sponsored
by: Fiskars |
|