Close this window to return to series
500 project listing |
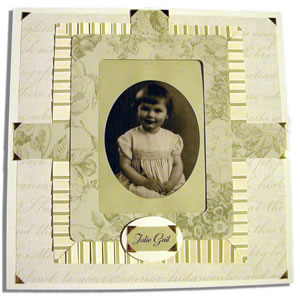
Pleated
Borders
by Julie McGuffee for Fiskars |
Add a touch of elegance, dimension
and texture with a simple pleated border. |
| Materials
Needed |
 |
| |
 |
Paper:
12' x 12" Cardstock - Off White
12" x 12" Coordinating Papers (3 designs and one plain)
- Anna Griffin |
| |
|
Tools:
Nested Ovals Template - Fiskars
Large Rectangle Templates - Fiskars
Shape Cutter - Fiskars
Craft Mat - Fiskars
12" Euro Trimmer with Scoring and Cutting Blade |
| |
|
Embellishments:
Gold Photo Corners - 3M |
| |
|
Adhesives:
Photo Mounting Squares, Foam Mounting Tape, Double Sided Photo Tape
- 3M |
| |
| Instructions |
| |
1. |
Trim 1" from the top and one side of one sheet
of patterned paper. Center on the background paper then attach with
a gold photo corner at each corner. |
| |
2. |
Make an oval mat for your photograph by cutting
an oval opening in the center of a 5" x 7" rectangle.
Attach the photograph behind the opening then adhere the rectangle
to the center of the page with double stick tape. |
| |
3. |
Score lines across a 12" sheet of striped
paper. The first line is 1" from the edge of the sheet, the
second 1/2" from the first line. Continue scoring lines alternating
1" and 1/2" apart across the whole sheet from top to
bottom. Starting with a mountain fold on the first scored line
and a valley fold on the next line, carefully pleat the paper.
You will need to cut the pleated paper into eight, 1.5" wide
strips. Before cutting the strips, place a strip of double sided
adhesive tape across the pleats to hold them in place. |
| |
4. |
To miter the corners, place the end of one folded
strip on top of a second strip at right angles, aligning the edges
of the corners (pleats should be facing toward the corner). Hold
tightly then cut across both strips from the inside corner point
to the outside corner point. Make four corners then adhere on
top of the corners of the mat at the center of the page overlapping
the edge by about 1/4". Using a large rectangle template,
cut a 4" x 6" rectangle from a 4th coordinating sheet
of paper. Cut around the outside of the same template to create
a frame. Place the frame on top of the pleated border and mat
with foam layering tape. |
| |
5. |
Cut three, 1.5" wide strips of the paper
you used for the frame about 3.5” long to cover where the
pleated border strips meet. Attach one end with gold photo corners
then secure the opposite end under the frame with a photo mounting
square. Write or print a title then mat with an off white oval.
Secure title with gold photo corners. |
| Sponsor:
Fiskars |
|