Close this window to return to series
500 project listing |
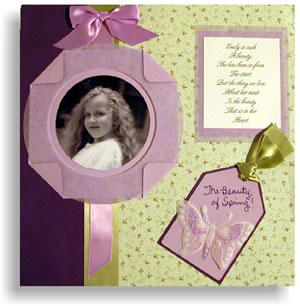
Beauty
of Spring
by Diana Swensen for Fiskars Brands, Inc. |
| Materials
Needed |
 |
| |
 |
FISKARS@ Supplies:
Shape Cutter
Shape Templates - Tags
Super-Sized Shape Templates - Square, Circle Parchamore Kit with
Butterfly Stencil Set Craft Mat
Hand Punch - 1/4" Circle
12" Euro Paper Trimmer
Non-Stick Micro- Tip@ Scissors
Clear Mounting Stickers
Photo Tape Roller |
| |
 |
Other Supplies:
Cardstock - purple, white, two-tone violet |
| |
|
Printed Paper - viney floral |
| |
|
Vellum - lavender floral |
| |
|
7/8" Satin Ribbon -lavender |
| |
|
1 1/2" Satin Ribbon - sage green
Purple Marker |
| |
| Instructions |
| |
1. |
Trim floral printed paper to 9" x 12".
Match the right edge of the printed paper
with the right side of the dark purple two-tone cardstock and adhere
in place. |
| |
2. |
Cut a 14" piece of the sage green ribbon.
Apply photo tape to the backside of the ribbon at the top and
bottom. Remove tape covering, fold ribbon over and secure. This
step is helpful to prevent fraying of the ribbon. Apply photo
tape to all the edges on the backside of the ribbon.

|
| |
3. |
Remove tape covering, match the left edge of the
ribbon with the left edge of the printed paper making sure to leave
approximately 1/2" of ribbon overlapping at each end of the
cardstock. Fold the ribbon over the top and bottom edge and secure. |
| |
4. |
Cut a 10" piece of lavender ribbon then trim
one end at a slant. See page example. |
| |
5. |
Apply photo tape to the backside of the ribbon then
remove the tape covering. Center the lavender ribbon onto the green
ribbon starting about 3/4" from the top of the page and secure
in place. |
| |
6. |
Use the remaining lavender ribbon to create a bow
and adhere it to the top of the border as shown in the page example. |
| |
7. |
Using Shape Cutter and Super-Sized Circle Shape Template,
center the 4" circle over your photo cut it out. Next cut a
frame out of vellum. |
| |
8. |
Using Super-Sized Square Shape Template and purple
cardstock, cut around the outside of the frame creating a 6"
square. |
| |
9. |
Center the vellum circle onto the purple square.
Holding the circle in place carefully bend each corner of the purple
square towards the center and crease. |
| |
10. |
Apply clear mounting stickers to the underside of
the corner and adhere corners to the vellum circle. |
| |
11. |
Adhere the photo to the center of the frame and adhere
the frame to the page as shown in the example. |
| |
12. |
Using the Shape Cutter and the Tags Shape Template,
cut a Jumbo tag out of purple paper. Apply adhesive to the back
and adhere to a piece of dark purple paper. Trim around the tag
creating a 1/8" border. Punch a hole in the top of the tag
using the 1/4" circle punch. Attach the leftover 1 1/2"
green ribbon to the top of the tag and trim as desired. Adhere the
tag to the page as shown in the page example. |
| |
13. |
Following the manufacturers instructions, create
the butterfly using the new Parchamore system and butterfly stencil
set. Color the backside of the butterfly with colored pencils and
trim around the design leaving a slight edge. Adhere to the tag
as shown in the example. |
| |
14. |
Using a purple marker, write a short quote onto the
top of the tag. |
| |
15. |
Cut a 4" x 5" piece of vellum, a 3 1/2"
x 4 1/2" piece of purple card stock and a 3" x 4"
piece of white cardstock. Center and adhere the purple cardstock
to the backside of the vellum. Center and adhere white cardstock
onto the front of the vellum. Adhere the journal box to the page
as shown in the page example. |
| |
|
|
| Sponsor:
Fiskars |