Close this window to return to series
400 project listing
Creating
with Scraps by: Sandy Laipply
Many useful projects can be made from
the small scraps of cardstock you have left over when scrapbooking,
using your scrapbooking tools. Here are 3 samples:
Materials
Needed
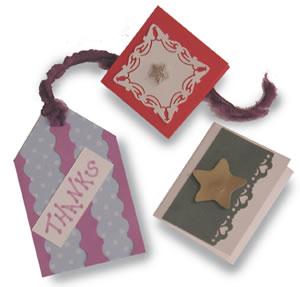
Green and White Card
White and forest green cardstock
Gold metallic paper
Fiskars Heart Border Punch
Fiskars ShapeCutter and Star template
Fiskars Personal Paper Trimmer
Glue Dots® Memory Book and Pop Up
Instructions
1.
Use the personal paper trimmer to cut a piece of
white cardstock 3” x 5-1/2”. Fold in half.
2.
Cut a piece of forest green cardstock 2-1/2”
wide, and punch a continuous heart border along one lone edge. Trim
to 3” long. Use 4 Memory Book Glue Dots® to adhere to
front of white card.
3.
Use the ShapeCutter and star template to cut a 1”
star from gold paper. Use a Pop Up Glue Dot® to adhere to front
of card.
Materials Needed “Thanks”
tag
Fiskars Photo Memories Patterned Cardstock –
Pastels: green and blue dotted cardstock
Purple and white cardstock
Fiskars Seagull Long Paper Edgers
Fiskars ShapeCutter and Tags Template
Fiskars 1/4” Circle Hand Punch
18” Length purple fiber
Purple Marker
Mini Glue Dots®
Instructions
1.
Use the ShapeCutter and tag template to cut a tag
from the blue/green cardstock.
2.
Use the Seagull paper edgers to cut 2 strips of purple
cardstock at least 5” long with one straight edge and one
cut edge.
3.
Cut another 5” strip of purple cardstock. Turn
scissors over and match pattern to cut second side.
4.
Refer to photo, and use Mini Glue Dots® to adhere
purple strips to blue side of tag.
5.
Write “Thanks” on a 2-1/2” x ¾”
scrap of white cardstock. Use Mini Glue Dots® to adhere at an
angle to center of tag.
6.
Punch a hole on top center of tag. Double fiber and
insert through hole. Pull fibers through loop and tighten.
Materials Needed Red
Card
Red and white cardstock
Fiskars Elegance Border Punch
Star button
Glue Dots® Craft and Memory Book
Fiskars Personal Paper Trimmer
Pencil
Instructions
1.
Use personal paper trimmer to cut a 2” square
from white cardstock. Mark center on all sides. Insert one side
in border punch, matching center marks on both punch and cardstock.
Remove and rotate 180º. Punch as before. Punch 2 remaining
sides.
2.
Use the personal paper trimmer to cut a 2-1/2”
x 5-1/2” rectangle from red cardstock. Fold in half.
3.
Use Memory Book Glue Dots® to adhere white medallion
to front of card.
4.
Use Craft Glue Dots® to adhere star button to
center of medallion.