Close this window to return to series
400 project listing
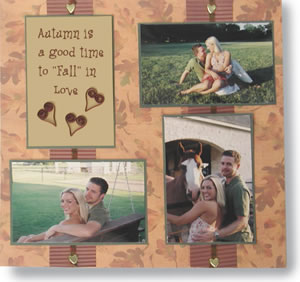
Quilling
by: Julie McGuffee
Quilling is an old paper crafting technique
from the 60’s and 70’s that has been revived to embellish
our latest projects. Cutting narrow strips of paper for Quilled
embellishments is easy when you use your Paper Trimmer!
Materials
Needed
Fiskars Paper crimper
Fiskars Ultimate Paper Trimmer
Fiskars Hand Punch – 1/ 8”
Hole
Xyron 900 w/ Re-positionable Adhesive
Cartridge
Fiskars Photo Memories Cardstock –
Green, Tan and rusty brown
Fiskars 1/16” Hole Punch
12” x 12” Background paper
4 Gold Heart Brads
24”Matching Fiber
Tweezers
White Paper glue
Quilling tool or long needle
Remember to choose colors of paper and embellishments
that complement your photographs. Colors chosen here reflect the
colors and theme of my photographs, but may not be the best color
choices for yours.
Instructions
1.
Apply adhesive to the back of each photograph then
place on green paper. Use the paper trimmer to cut the cardstock
around the photograph about 1/8” from the edge.
2.
Cut two 11” lengths of brown paper 2”
wide. Crimp the strips with the crimper.
3.
Prepare your title/journaling box by whichever method
you prefer. Hand write, use your computer, or stickers. Mat the
box with green in the same manner as you matted the photographs.
4.
Using the format shown, or one that better suits
your photographs, arrange the crimped strips, photographs and journaling
box onto the 12” x 12” paper. DO NOT GLUE YET. You will
note that the 11” strips are now even shorter after crimping
so you will have to cut them. Attach the top of each strip to the
top of the page about 2” in from the edge. Punch a hole at
the center of each strip about 1/2” down from the top. Attach
with a heart brad. You will now need to cut each of the strips at
a place that will later be covered by a photograph. Cut then attach
the second half of each strip to the bottom of the page. Glue the
ends in place. These will be hidden when your page is finished.
5.
Cut the 24” piece of fiber in half, then attach
the ends to each of the heart brads to secure on top of the crimped
strip.
6.
Place the parallel line template onto the paper trimmer
then use as a guide to cut 1/8” wide strips of rusty brown
cardstock about 6” in length. Fold each strip in half. Insert
the end of one strip into the quilling tool then roll the paper
inward toward the center fold. Remove the tool then repeat with
the opposite side. Create 3 (or more) quilled hearts in this manner.
7.
Pour a puddle of white glue onto a scrap piece of
paper. Holding the “quilled” pieces with tweezers, dip
the edges into the glue then place onto the project as shown.
TIP:
Cardstock is more sturdy than lightweight paper when
quilled and easier to work with.