Close this window to return to series
400 project listing |
| “Countdown
Calendar” by: Sandy Laipply |
| Materials
Needed |
 |
| |
 |
Fiskars Photo Memories Cardstock –
Brights 2 sided cardstock – purple/yellow, turquoise/yellow |
| |
|
Cardstock – raspberry, white |
| |
|
Gold metallic paper |
| |
|
Fiskars personal paper trimmer |
| |
|
Fiskars ShapeBoss |
| |
|
Fiskars Scrappin Phrases 1 stencil set |
| |
|
Fiskars ShapeCutter |
| |
|
Fiskars Templates – squares, stars,
and celebration |
| |
|
White crochet thread |
| |
|
Glue Dots® - Memory Book, Mini and
Pop Up |
| |
|
Decorating chalks – raspberry,
purple, yellow, rust, dark blue, turquoise, purple |
| |
|
Fiskars Deckle Long Paper Edgers |
| |
|
¾” Black number stickers |
| |
|
White paint pen |
| |
|
Ruler |
| |
|
Pencil |
| |
|
Eraser |
| Instructions |
| |
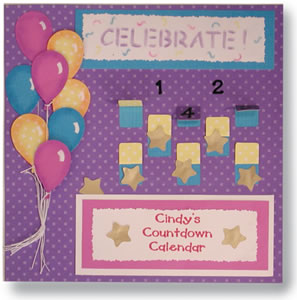
1. |
MAKE THE WINDOWS: Measure and mark the purple side
of the cardstock as follows: from the top, measure down 4”,
5-1/4”, 6-1/2”, 7-3/4”; from the right side mark
1”, 2-1/2”, 3-1/2”, 4/3/4”, 6”. Draw
lines parallel to side of paper on all measurements to mark a grid.
This will show you where to cut the windows. Use the square template
and the Shape Cutter to cut 1” windows. In the top row, start
in the second square from the right side. Position the template
on the left and bottom lines, and cut a 3 sided window. DO NOT CUT
THE TOP OF THE SQUARE. Cut windows in every other square on the
grid. You will have 2 windows in the first and third row, and 3
windows in the second and fourth row. Erase lines. Use Memory Book
Glue Dots® to adhere this piece to a sheet of turquoise cardstock. |
| |
2. |
MAKE THE POCKET: Computer generate words for large
pocket and print in raspberry ink to fit a 7-1/2” x 2-1/2”
rectangle of white cardstock. Use the deckle paper edgers to trim
all sides. Use Memory Book Glue Dots® to mount on a raspberry
rectangle. Use the paper trimmer to trim a ½” border
on each side. Repeat with white cardstock. Use 7 Memory Book Glue
Dots® along the bottom, and 3 Pop Up Glue Dots® on each
end to attach the pocket to the bottom right side of the purple
page. DO NOT ADHERE THE TOP OF THE POCKET TO THE PAGE. Use the star
template and the ShapeCutter™ to cut 10 small stars from the
gold paper. Place stars in pocket. |
| |
3. |
MAKE THE TITLE: Use the Shape Boss™ and the
Scrappin’ Phrases I stencil set to emboss “Celebrate”
on a piece of white cardstock. Turn the sandwich of top stencil,
cardstock, and bottom stencil – chalk the word with purple
chalk and the confetti with raspberry, yellow, and turquoise. Use
Memory Book Glue Dots® to mount on a rectangle of turquoise
cardstock. Use the paper trimmer to trim a ½” border
on all sides. Use Pop Up Glue Dots® to adhere to upper right
side of page. |
| |
4. |
MAKE THE BALLOONS: Use the ShapeCutter™ and
the celebration template to cut 3 yellow, 2 turquoise, and 3 raspberry
balloons. Chalk the yellow balloons with rust, the turquoise balloons
with dark blue, and the raspberry balloons with purple. Use the
white paint pen to make a highlight on the right side of each balloon.
Tie a string around each balloon. Refer to photo for placement,
and use Glue Dots® to adhere balloons in a bunch on left side
of page. Use Pop Up Glue Dots® under some of the balloons to
add dimension, and Memory Book Glue Dots® under others. Gather
all the strings together and tie with an additional piece of string.
Pull the strings taut and use a Mini Glue Dot® under the knot
to secure in place. |
| |
5. |
COUNTDOWN: each day, fold back one window and use
a Memory Book Glue Dot® to secure in place. Take a gold star
from the pocket and use another Memory Book Glue Dot® to secure
the star in the open window. |
| Sponsor:
Glue Dots
|
|