Close this window to return to series
400 project listing
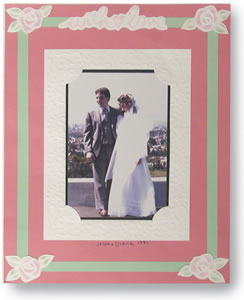
“With
Love” by Diana Swensen
Materials
Needed
Fiskars Mini Shape Boss
Fiskars Mini Shape Boss templates –
With Love and Victorian
Fiskars Embossing Stylus
Fiskars 12” Paper Trimmer
Fiskars Xacto Knife
Fiskars Cutting Mat
Fiskars Photo Stickers
Two strips – light green cardstock
3/8” x 6-1/2”
Two strips – light green cardstock
3/8” x 9-1/2”
One piece – pink cardstock 8-1/2”
x 11”
One piece – white cardstock 5-1/2”
x 7-1/2”
One piece – white cardstock 2”
x 5”
One piece – black cardstock 3-7/8”
x 5-7/8”
Photo – 3-5/8” x 5-5/8”
White cardstock scraps for corner roses
Wax paper
Chalk – pink and green
Fine line green marker
Q-tips
Instructions
1.
Center and adhere photo to 3-7/8” x 5-7/8”
black cardstock.
2.
To create the white embossed frame, place the “Victorian
template onto the Mini Shape Boss.
3.
Lift one side of the top clear template and position
the 5-1/2” x 7-1/2” piece of white onto the Mini Shape
Boss.
4.
Place a piece of wax paper in between the cardstock
and the clear top template. (tip: the combination of bottom template,
cardstock, wax paper, and top template is referred to as the “embossing
sandwich”)
5.
Emboss the corner design. Remove wax paper and emboss
again. (The second embossing creates a deeper more detailed image.)
6.
Repeat steps 1-4 for each corner of the white cardstock
frame.
7.
To emboss the end of the frame; align the sides of
the cardstock frame with the edges of the design. Position the end
of the cardstock 1/16” below the last grid line.
8.
Place a piece of wax paper in between the cardstock
and the clear top template. Emboss the two center border design
elements. Remove wax paper and emboss again.
9.
Rotate the cardstock 180 degrees and repeat steps
6 and 7.
10.
To emboss the sides of the frame; align the edge
of the paper with the fourth hole in from the design edge and 1/16”
from the bottom black grid line.
11.
Place wax paper in between the cardstock and the
clear top template. Emboss the side of the frame.
12.
Rotate the cardstock 180 degrees and repeat steps
9 and 10.
13.
Using the Xacto knife cut all four corners of
the frame to allow matted photo to mount on frame.
14.
Center framed photo onto an 8-1/2” x 11”
piece of pink cardstock.
15.
Center a 3/8” x 9.5” light green cardstock
strip between the top and bottom of the page and ½”
from the left side of the page. Adhere cardstock strip into place.
16.
Repeat step 15 on the right side of the page.
17.
Center a 3/8” x 6-1/2” light green cardstock
strip between the left and right sides of the page and a ½”
from the top of the page. Adhere cardstock strip into place.
18.
Repeat step 17 at the bottom of the page. (Do not
be concerned if the light green strips do not meet in the corners,
they will be covered with the embossed rose design.
19.
Place the “With Love” template onto the
Mini shape Boss.
20.
Create the “embossing sandwich” using
white cardstock.
21.
Emboss the rose design, remove the wax paper and
emboss again.
22.
Carefully turn the embossing sandwich over and color
the rose with pink chalk and the leaves with green chalk.
23.
Place embossed rose onto a cutting mat and carefully
cut around the design with an Xacto knife.
24.
Repeat step 23 to create three more roses.
25.
Place a rose in each corner of the page.
26.
Create an embossing sandwich with a 2” x 5”
piece of white cardstock. Place the cardstock so that the words
“with love” can be easily embossed.
27.
Emboss the words, remove the wax paper and emboss
again.
28.
Carefully turn the embossing sandwich over and color
the words with pink chalk.
29.
Remove the cardstock and place onto a cutting mat.
Using an Xacto knife cut out around the words.
30.
Center onto the light green cardstock strip at the
top of the page and adhere into place.
31.
With a fine line green marker journal the names and
date under the photo frame.