Attach white blender tips to stylus handle. Use Fluid
Chalk inks to apply color to white Mozaics squares. (I used a 4x8
section of squares) Overlap colors and allow them to blend.
2.
Condition white Premo clay and roll out a thin sheet
(about as thick as three pieces of cardstock). Use the foam tips
and stylus to apply ink to the entire surface of the clay sheet
as you did with the Mozaics paper. Bake at 275 degrees F for 25-30
minutes.
3.
Use the same technique to color the self-adhesive
metal embellishments. If desired, the embossing heat gun may be
used to speed drying, but the Fluid Chalk inks will dry on the metal
if given enough time. Once the ink is dry, highlight texture with
copper rub-ons.
4.
Position the leaves on work surface, veins facing
up. Use the embossing heat tool to heat the PenScore until the surface
softens. Quickly press the PenScore onto the leaves and let cool.
5.
Ink the PenScore stamp with leaf green Ancient Page
ink and stamp Mozaics squares. Re-ink and repeat to cover the rest
of the Mozaics. Highlight squares with copper rub-ons.
6.
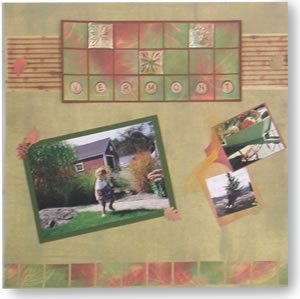
Peel up Mozaics squares and position on dark brown
cardstock in three rows of seven, leaving a small amount of space
between each tile. Trim brown cardstock.
7.
Cut a strip of falling dots” paper 2.25 x 12
inches and adhere near the top of a sheet of “green grass”
paper.
8.
Use Chalk inks to color a piece of tan maruyama mesh
to match the layout, then adhere it over the strip of "falling
dots". Center the mosaic over this strip and adhere.
9.
Add title with typewriter key stickers.
10.
Position a few self-adhesive metal embellishments
over some of the mosaic tiles.
11.
Cut a dark green mat for the focal photo and highlight
edges of mat with copper rub-ons. Add photo and mount on page.
12.
Rub a small amount of copper rub-ons onto tag stickers
from Magenta. Adhere small photos to tags and position stickers
on page as shown.
13.
Tie a small strip of tangerine mesh into a knot and
adhere over tags.
14.
Create a border along the bottom edge of the page
with remaining mosaic tiles.
15.
Punch leaf shapes from baked sheet of polymer clay
and adhere to page with Glue Dots.