Close this window to return to series
400 project listing
Embossing
Techniques By Lynell Harlow
USING REGULAR EMBOSSING PASTE
The regular paste is the easiest for beginners to work with and
stencil on. If you have both pastes try this one first
Materials
Needed
Dreamweaver Embossing Paste (opaque)
Palette knife
Stencil shield
Dreamweaver brass stencil – LL322
Lily
Chalks
Small 1/8” stencil brush
Removable Tape
Colored scrapbook paper
Instructions
1.
Tape down the brass stencils with removable tape
making sure all the edges are covered.
2.
Load a generous amount of paste on the palette knife
and gently spread it over the stencil until all the spaces are filled
with it. Scrape off the excess and return it to the jar.
3.
Remove the stencil with a “hinge” technique
so that the paste is not smeared, then place the stencil in a water
bath and gently wash it with a small scrub brush.
4.
Wait 20-30 minutes then replace the stencil on top
of the pasted bouquet. To add color to the centers of the flowers
use a small hole from the stencil shield and stencil with chalk.
The shield aids you in getting color specifically where you want
it.
USING TRANSLUCENT
EMBOSSING PASTE
For a glossy finish use Dreamweaver translucent paste. It dries
clear. If you want a colored finish you’ll need to add color
into it. If this is the first time you have attempted using the
paste try it out on scraps of card stock until you get a feel
for the technique.
You will need:
Dreamweaver Translucent Embossing Paste
Palette Knife
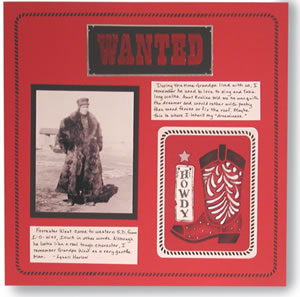
Dreamweaver brass stencil – LJ843 “Wanted”
Red acrylic paint
Removable tape
Black card stock
Instructions:
1.
On a piece of palette paper place one tablespoon
of translucent paste and ¼ teaspoon of red acrylic paint.
Blend these together until well mixed. The paste will appear a bit
“milky”, but will dry bright red.
2.
Tape out the “wanted” stencil with removable
tape making sure all the edges are taped to avoid seepage onto the
paper.
3.
Spread the paste in one or two passes to fill in
all the open spaces of the stencil. Remove the tape with a “hinge”
technique, leaving that last piece of tape in place and lifting
against it so the paste does not smear.
4.
Clean the stencil in water with a small scrub brush.
5.
The translucent paste can take as long as an hour
to dry, so give it plenty of time, then crop the card stock and
mount it onto the scrapbook page.