Close this window to return to series
300 project listing
Red
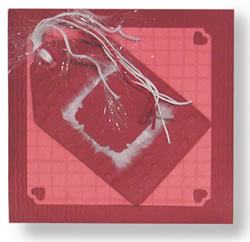
Card with Tag & Textured Embossing
by Beth Madland
Materials
Needed
Fiskars Shape Cutter tool
Fiskars Shape Cutter tag template
Fiskars craft matte
Fiskars wavy line Texture Plate
Fiskars heart Texture Plate
Fiskars Mini Shape Boss and starter
stencil set
Fiskars Heart three in one corner punch
Fiskars Heritage three in one corner
punch
Fiskars embossing tool
Fiskars paper trimmer
Fiskars ¼ inch round hand punch
Red cardstock
Red patterned paper
White mulberry/hand-made paper
Red and white fiber
Foam adhesive dots
Instructions
1.
Cut out the base of the card from red cardstock 5
½ x 11 inches.
2.
Fold the card in half.
3.
Cut a piece of red decorative paper 4 ½ x 4
½
4.
Place one half of the card on top of the wavy line
texture plate. Use embossing stylus and follow the lines of the
texture plate. Make sure you have textured the entire front of the
card!
5.
Using the Heart 3 in 1 corner punch, punch out each
corner of the 4 ½ inch square decorative paper. Adhere the
decorative paper on top of the wavy line textured side of the card.
6.
Next you want to add the heart texture to a piece
of cardstock – just enough to cut out the tag. Take the heart
texture plate, put a piece of cardstock over it and rub the embossing
tool on the cardstock until the design is revealed.
7.
Place the craft matte on a table. Next put the heart
embossed red cardstock on the craft matte. Place the Shape Cutter
tag template on top of the cardstock. Cut out a tag using the Shape
Cutter tool. Use the ¼ inch round hand punch to punch a hole
in the top of the tag.
8.
Angle the tag on the decorative paper and adhere it
to the card using foam adhesive dots.
9.
Set up the Mini ShapeBoss with the stencil it came
with – adjusting the orange pegs. Slip a piece of red cardstock
in between the two stencils. Emboss the heart design using the embossing
tool.
10.
Cut the heart design into a square using scissors
or your paper trimmer. Use the heritage 3 in 1 corner punch to punch
out each corner of the small square. Mount the red square with a
foam adhesive dot and place on a slightly larger piece of white
mulberry paper.
11.
Adhere the small square and mulberry paper to the
tag on the card.
12.
Pull fibers through the hole at the top of the tag.