Black 12 x 12 Lasting Impressions Paper
for embossing
Black 8 ½ x 11 Lasting Impressions
Paper
Light box
Embossing tool (stylus)
White cardstock
Red cardstock
Red fiber
Clean photo corners
Adhesive
Instructions
1.
Turn on a light box and place the heart/flower stencil
on top. Lay a piece of red cardstock on top of the stencil. You
should be able to see the outline of the brass stencil design through
the cardstock.
2.
Take your embossing tool and go around the outside
edge of the heart. You do not need to rub your stylus on the middle
of the heart – the impression will be made when you use your
tool around the edge of the heart.
3.
Pick up your piece of red paper and trim the heart
with some micro tip scissors. Leave at least a 1/8th inch border
around the heart – if you cut too close to the heart you will
lose the embossed effect.
4.
Take a white piece of cardstock and place it on top
of the stencil. Use your embossing tool and gently trace the “leaves”
of the heart/flower design. Place the red heart in between the two
“leaves” and adhere the heart to the white cardstock.
Poke two holes (one on each side of the “leaves”) and
look a red bow through the holes.
5.
Use your paper trimmer and trim this design to 3 ¼
x 4 inches.
6.
Remove the heart/flower stencil from the light box
and place the checker board stencil on the light box. Take a piece
of black Lasting Impressions paper and place the paper color side
down. You will emboss on the white side of this paper.
7.
Use your embossing tool to emboss each square of the
checker board.
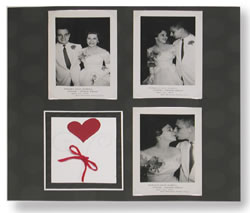
8.
Matte your heart/flower accent on the black checker
board paper. Matte that onto white cardstock.
9.
Arrange your embossed accent with your other photos
and adhere them with adhesive.
Tips:
1.
The balls on the end of the embossing tool come in
three sizes. I generally use the largest size embossing tool because
I find it won’t punch through the paper as easily. I do use
the other sizes of embossing tools for more intricate patterns.
2.
If
you find you are tearing/punching through the paper you are embossing
it means you are pressing too hard. Ease up the pressure and go
over the design more than once – eventually you’ll get
a deep impression without tearing/ripping.
3.
Rub wax paper on the side of the paper you will emboss.
This helps your embossing tool move easily along the brass stencil
design.
4.
Light boxes are the best for brass stencil embossing.
Some people have embossed with brass stencils by holding the stencil,
paper and embossing tool up to a window that has a lot of light
coming through. This works but it can be awkward.
5.
The thickness of your paper matters when embossing
with brass stencil. I prefer the Lasting Impressions paper because
it has a white backing and you can see the stencil through the paper
– even the black paper. Chances are you’ll have more
trouble embossing on plain black cardstock. It can be done but it’s
more like “blind” embossing. Also, heavier weight cardstock
(thicker) makes it more difficult to see the brass stencil designs.