Close this window to return to series
300 project listing |
| Quilling
Accents by Julie McGuffee |
| Cutting narrow strips
of paper for Quilling embellishments is easy when you use your Paper
Trimmer! |
| Materials
Needed |
 |
| |
 |
Fiskars Templates – Circles, Letters
3, Fun Shapes 1 and Windows 1 |
| |
|
Fiskars Shape Cutter |
| |
|
Fiskars Paper Trimmer |
| |
|
Fiskars Hand Punch – 1/ 8”
Hole |
| |
|
Xyron 900 w/ Re-positionable Adhesive
Cartridge |
| |
|
Fiskars12” x 12” Reversible
Background Paper :Pale Blue/Pale Yellow, Medium Blue/Bright Green |
| |
|
Fiskars Photo Memories Cardstock –
Pastel Pink |
| |
|
7 Gold Brads |
| |
|
Pale Green Vellum |
| |
|
Tweezers |
| |
|
White Paper glue |
| |
|
Quilling tool or long needle |
| |
| Remember to choose colors of paper and embellishments
that complement your photographs. Colors chosen here reflect the
colors and theme of my photographs, but may not be the best color
choices for yours. |
| Instructions |
| |
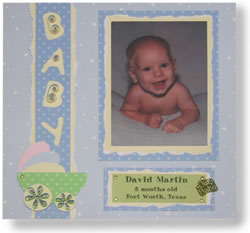
1. |
Apply adhesive to the back of a 5” x 7”
photograph then place on pale yellow paper. Tear the cardstock around
the photograph about 1/4” from the edge. |
| |
2. |
Apply adhesive to the matted photograph then place
on the medium blue paper. Use the paper trimmer to trim the blue
paper about 1/2” – 3/4” from the edge of the photograph. |
| |
3. |
To make the journaling box, cut a rectangle of medium
blue paper about 6’ long and 2” – 3” wide.
Tear a pale yellow rectangle about 1/ 2” smaller, apply adhesive
then center on the blue rectangle. |
| |
4. |
Cut a 12” strip of medium blue paper about 2”
wide. Using the Letters template and shape cutter,, cut the word
“BABY” vertically down the center. TIP: I cut the letters
first then cut the strip with the letters at the center. Apply adhesive
to the title strip then attach to pale yellow paper. Tear the yellow
paper about 1/4” away from the side edges. |
| |
5. |
Write any journaling information on vellum then attach
to the journaling block with brads. Using the project photo as a
guide, arrange, then place the title, matted photo and journaling
block on the background paper with adhesive. |
| |
6. |
To make the baby carriage, cut the arch from the windows
template from bright green paper. Cut a 1 1/2” circle and
a 1” circle from pale yellow paper and a pale yellow, pale
pink and pale blue funky heart. Stack the 3 hearts on top of each
other then punch a hole through all 3 at the point. Punch a hole
at the top left corner of the arch (carriage) then attach the hearts
to the carriage with a brad. Spread the hearts apart as shown. Glue
the carriage at the base of the title strip. |
| |
7. |
Punch a hole at the center of each circle for the
carriage wheels. Place a brad through each hole then glue the wheels
to the carriage. |
| |
8. |
Cut 1/8” wide strips of pale blue/pale yellow
paper to embellish the alphabet letters and medium blue/bright green
paper to embellish the wheels. Coil the strips to make 6 teardrop
shapes for each wheel. Pinch the strips at the center to shape.
Cut two strips of pale blue/pale yellow paper about 4” long
for the “B” letters. Starting at the ends, coil each
end inward until they meet at the center. Coil a short piece until
it is large enough to place on the letter “A”. |
| |
9. |
Pour a puddle of white glue onto a scrap piece of
paper. Holding the “quilled” pieces with the tweezers,
dip the edges into the glue then place on the project as shown. |
| |
10. |
Option. Attach a gold charm to the corner of the journaling
block with the brad. |
| |
|
TIP:
Cardstock is sturdier than lightweight paper when quilled and is
easy to work with. |
| Sponsor:
Fiskars |