Xyron 510 Machine and re-positionable
adhesive cartridge
Instructions
1.
Cut the lavender patterned cardstock in half so that
each piece measures 5.5 x 8.5. Using the paper trimmer and scoring
blade, score a line down the center of the card. Fold in half to
form a quarter sheet card. The card should measure 5.5 x 4.25. Each
sheet will make two cards.
2.
Use the paper trimmer to divide the pastel lavender
sheet into 4 equal pieces measuring 4.25 x 5.5.
3.
Use the “You’re Invited” template
to emboss flowers at each corner of one piece of the lavender cardstock.
Trim around the edges with the scallop scissors.
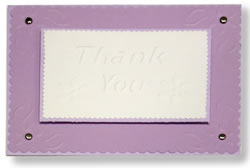
4.
Cut a 4 x 2.5 piece of lavender patterned cardstock
and white cardstock.
5.
Emboss the words “Thank You” at the center
of the white cardstock, moving the paper so that “You”
is beneath “Thank”. Emboss two flowers at each side
of the “you” using the “You’re Invited”
template. Trim around the edges of the white piece with the mini
scallop scissors. Apply adhesive then place at the center of the
lavender patterned rectangle.
6.
Place the lavender rectangle on the front of the card
then punch a hole at the center of each embossed flower at the corners
of the lavender rectangle. Attach the lavender rectangle to the
card with a silver brad at each corner.
7.
Attach the “Thank You” center piece to
the center of the card front by placing a foam dot at each corner.
TIP:
Make a matching envelope using the Fiskars Envelope 2 Template.