Xyron 900 machine with permanent adhesive
cartridge
1” flat paintbrush
Scissors
Pencil with eraser
Delta Spray satin varnish
Computer and printer
Instructions
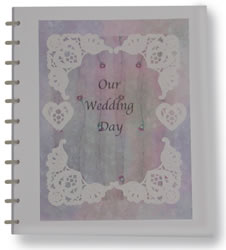
1.
Paint both sides of covers, allowing to dry between
applications. Use as many coats as necessary for opaque coverage.
2.
While covers are drying, print desired titled on mottled
paper. Measure and cut paper to 7 ½” by 10”,
making sure title is centered. Run through Xyron machine and apply
this paper to center front of one cover. Measure and cut a 6”
x 8” piece of vellum. Run through Xyron machine and apply
vellum in center of mottled paper.
3.
Cut 4 corner motifs and 2 hearts from doilies. Position
on vellum where desired and mark lightly with a pencil. Run doily
motifs through Xyron machine. Apply where marked. Erase any pencil
marks that show.
4.
Spray both sides of covers with 2 light coats of varnish,
allowing to dry between coats, and before assembling album.
5.
Attach binding discs to covers by slipping discs into
pre-punched openings. Lie covers with discs attached on a flat surface
and open with right sides down. Place several page protectors on
top of back cover so holes align with binding discs. Using 2 fingers,
press down on either side of discs to bind pages. Repeat to attach
as many page protectors as desired. Insert finished pages into page
protectors