Close this window to return to series
200 project listing |
| San
Francisco |
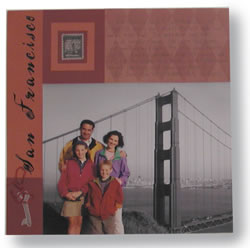
| The trend is texture – even in
your pictures – when you use the KODAK Picture Maker to combine
color with black and white! |
| Materials
Needed |
 |
| |
 |
A snapshot with people in the foreground
and visual interest in the background, and a KODAK |
| |
|
Picture Maker |
| |
|
12” x 12” diamond patterned
paper |
| |
|
12” x 12” cardstock –
two different shades of red/orange |
| |
|
Clear vellum |
| |
|
Black pen |
| |
|
Lettering stickers |
| |
|
Mini Pop-Dots |
| |
|
San Francisco stamp |
| |
|
Key stamp |
| |
|
Black stamp pad |
| |
|
Paper Edgers – stamp |
| |
|
Red fiber |
| |
|
Hole punch |
| |
| Instructions
|
| |
1. |
Make two 8” x
10” enlargements. Take your picture to a KODAK
Picture Maker and follow the on-screen directions to Select an 8”
x 10” enlargement. To get the full-color enlargement, Scan
your original picture and Print it. Follow the same steps again
– but to create a black and white enlargement, this time choose
Scan Black and White Picture. And Print. |
| |
2. |
Silhouette the people.
Carefully cut out the family form the color enlargement, trimming
right to the edge of their figures. Then match them up to where
they stand on the black and white enlargement, and use pop dots
to affix the color silhouette on top of, and slightly raised from
the black and white picture. |
| |
3. |
Piece together your
page. Use one 12” x 12” piece of red/orange
cardstock as the background page. Adhere the feature picture to
the lower right-hand corner of the page. To create the color blocking
technique shown, cut smaller pieces of patterned paper and cardstock.
Adhere it to the background page to create separate areas for your
title, journaling and accents. |
| |
4. |
Journal and title it.
Use lettering stickers to put the title along the upper left-hand
side of the layout. Use black pen to create your journaling on the
patterned paper in the upper right-hand corner. |
| |
5. |
Finish up with accents.
For the key accent; stamp the key image on clear vellum. Let it
dry completely, then cut it out. Punch a hole in the key and tie
fiber through the hole. Adhere to the page near the title block.
For the stamp accent: stamp the image on the clear vellum. Let it
dry completely, then cut it out using decorative edge scissors.
Mat on various shades of cardstock and adhere to the remaining block. |
| Sponsor:
Eastman Kodak Co. |
|