Close this window to return to series
200 project listing
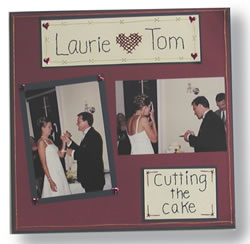
Cutting
the Cake by Beth Madland
Materials
Needed
Navy 12 x 12 cardstock
Maroon 12x 12 cardstock
Crème cardstock (any size –
scraps will work)
Navy DMC embroidery floss
Maroon DMC embroidery floss
Thin gold thread
Metal hearts from Scrapyard 329
Instructions
1.
Matter maroon cardstock on top of navy cardstock leaving
a quarter of an inch border.
2.
Cut a piece of crème cardstock 8 ½”
x 2 ½” inches.
3.
Using a pencil, lightly trace a design onto the crème
cardstock. For my example I drew a heart on the paper and then filled
the heart with X’s.
4.
Take a sharp needle or paper piercing tool and poke
holes in all four corners of each X of the heart. Remember that
some of the X’s will be sharing the same hole.
5.
Poke holes along the lines of the names using a sharp
needle or paper-piercing tool. Remember to put more holes around
the curves of a letter to make a rounded look – otherwise
the letter might turn out boxy.
6.
Thread a needle with four strands of the maroon embroidery
floss.
7.
Adhere the tail of the thread to the back of the crème
cardstock with a photo tab. Cover the tab and floss with a small
square of scrap paper. This will keep your adhesive covered during
the project.
8.
For the cross stitches, bring the needle through the
bottom left corner of the X. Pull the thread through the hole and
bring the needle down through the upper right hole of the X. Bring
the needle through the bottom right hole of the X pulling the thread
through the hole. Bring the needle through the top left hole of
the X. Now you have completed one X. Keep repeating this with all
of the X’s of the heart.
9.
For backstitches the process is similar, but there
are no X’s to cross just straight stitches. Remember to bring
your needle back up through the next closest hole. Repeat this until
you have the names stitched using the navy embroidery floss.
10.
I used the gold thread to make long backstitches and
X’s for a border.