Close this window to return to series
200 project listing |
| Little
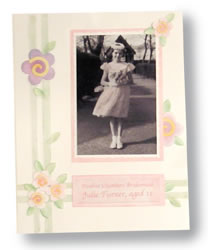
Bridesmaid by Julie McGuffee |
| Materials
Needed |
 |
| |
 |
Craf-T Products Chalks and Applicators |
| |
 |
Fiskars Paper Trimmer |
| |
 |
Fiskars Paper Edgers - Deckle |
| |
 |
Xyron Adhesive |
| |
 |
Flower Punch (large & medium) |
| |
 |
Swirl Punch (large & medium) |
| |
 |
Leaf Punch |
| |
 |
White Vellum |
| |
 |
White cardstock |
| |
 |
8.5” x 11” White Background
Paper |
| |
| Instructions
|
| |
1. |
Apply adhesive to the back of the photograph then
glue to white cardstock. Trim the cardstock around the edge of the
photograph with the deckle scissors to achieve the “old fashioned”
look. |
| |
2. |
Cut a piece of white cardstock (or vellum) about 3/4”
longer and wider than the matted photograph. Use the applicator
to color the edges of the vellum pink. Center, and then glue the
photograph to the center of this second mat. |
| |
3. |
Tear four, half inch strips of vellum as follows:
Place the piece of vellum on a flat surface under a ruler. Hold
the vellum in place by adding pressure to the ruler with one hand
then tear strips by pulling the vellum upwards against the edge
of the ruler. (The ruler on the paper trimmer can also be used to
do this.) |
| |
4. |
Punch 2 large flowers, 4 medium flowers, 2 large swirls,
4 small swirls and 17 leaves from white cardstock. Shade the swirls
with yellow chalk, the medium flowers with pink chalk and the large
flowers with lavender chalk. Shade the leaves and the vellum strips
with green chalk. (See tips*.) |
| |
|
Glue a swirl to the center of each flower. Arrange
then glue the photograph, vellum strips, flowers and leaves to the
background page as shown. Trim the horizontal vellum strips even
with the edge of the paper. |
| |
|
Write a title for your photograph on vellum the same
width as the deckle mat. Mat with a second piece of cardstock in
the same manner as the photograph. The title box should be the same
width as the matted photograph. Glue in place. |
| |
|
Use chalk lightly to add a hint of color to a black
and white photograph if desired. |
| |
Chalks will enhance any colored die cut,
or punched shape. However to achieve a particularly delicate look
for this particular photograph, I used chalking techniques to add
delicate colors to white cardstock and vellum. |
| |
|
CHALKING TIPS:
|
| |
|
1. Add
color to the center of the flowers in a circular motion expanding
to each petal as you work outward. |
| |
|
2. Hold
the pieces you wish to chalk in place by adhering to a scrap piece
of paper with re-positionable glue. |
| |
|
|
| |
|
NOTE:
Since this was a one-of-kind black and white photograph, I made
a copy of it on the Kodak Picture Maker to use on my scrapbook page |
| Sponsor:
Craf-T Products |