Supplies:
Personal computer with inkjet printer
Kaleidoscope Collections Kaleidoscope Kreator™ 3 software*
Digital photo (from a digital camera or scanned)
Inkjet photo paper
Spellbinders Wizard™ Die Cut Machine
Spellbinders Nestabilities™ Classic Heart Die Set
Removable tape
1/16” thick foam adhesive
Permanent adhesive
4 5/8” x 4 5/8” square light green cardstock
4 7/8” x 4 7/8” square dark green cardstock
5 ½” x 11” lavender cardstock
* Available from www.KalCollections.com
Instructions:
- In Kaleidoscope Kreator 3, open the digital photo. Then click on the Select Kaleidoscope Shape button in the toolbar and choose Circle (12) or Circle (16) for the template shape.
- Move the photo around in the workspace and watch the Kaleidoscope Preview in the upper right corner of the screen. Click on the Kaleidoscope Preview if you want to see a full-screen preview of the kaleidoscope.
- Before printing, we recommend you save the workspace so you can re-create the kaleidoscope if necessary. Click on the Save Workspace button in the toolbar (or select File>Save Workspace from the menu). Enter a filename and click Save. (The file will be saved with a KK3 extension, which can only be opened by Kaleidoscope Kreator 3.)
- Place the sheet of photo paper in the printer tray. Select File>Print Multiple from the menu and enter the following values in the Print Preview window that appears:
- Maintain proportions should be checked.
- Width: 4.6 inches; Quantity: 1; click Add.
Width: 3.8 inches; Quantity: 1; click Add.
Width: 3.0 inches; Quantity: 1; click Add.
Width: 2.25 inches; Quantity: 1; click Add.
Width: 1.55 inches; Quantity: 1; click Add.
Width: 0.9 inches; Quantity: 1; click Add.
- Check Print Margins and enter a margin size of 0.1 inches.
- Uncheck Show Cutlines.
- Set the printer properties for photo paper by clicking on the Properties button in the Printer Settings section.
- Choose Landscape for the paper orientation in the Page Setting section.
- Click the Print button at the bottom right to send to the printer.
- Let the printed sheet sit for 15-30 minutes.
- Cut the kaleidoscopes apart. (You just need to separate the kaleidoscopes so that they will fit through the Wizard. Don’t worry about trying to cut all of the white paper away. That will happen when you die cut.)
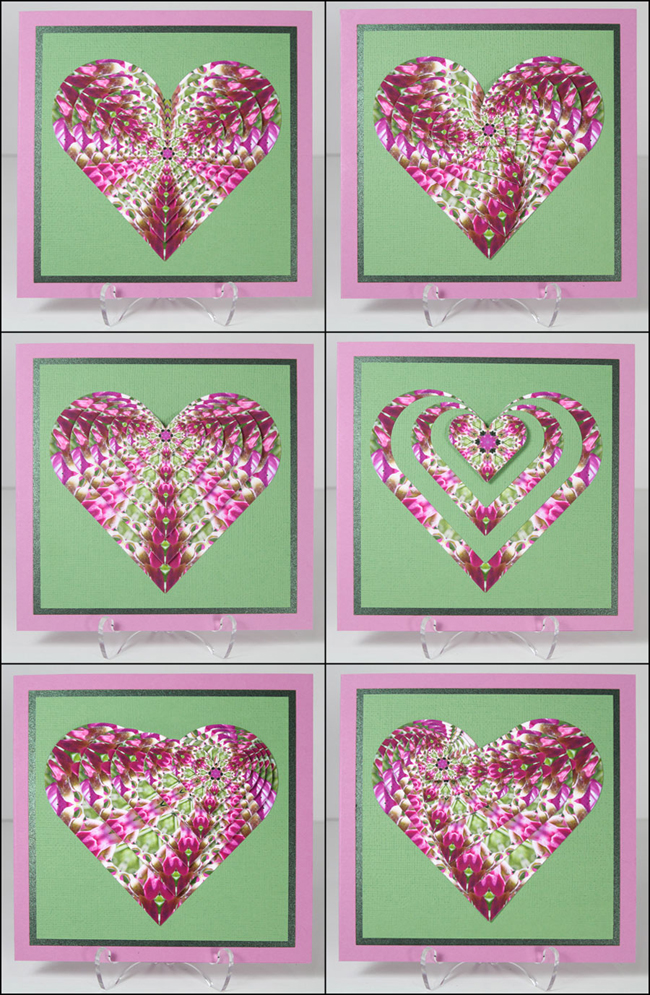
- Line up the heart dies on the kaleidoscopes so that each die is positioned in exactly the same way on each kaleidoscope. It’s important that the dies be lined up the same way on each kaleidoscope or the secondary design created by the layering will not work.
- Tape the dies in place, making sure that the tape does not touch the printed image inside the die.
- Run each kaleidoscope with die through the Wizard die cut machine.
- Layer the kaleidoscope hearts one on top of the other with the largest on the bottom and smallest on the top. Decide how you want to arrange them in terms of the center point and rotating point (see sample cards for some possible variations).
- Apply foam adhesive to the back of each heart and restack them as decided in the previous step.
- Fold the lavender cardstock in half to make the card base. Adhere the dark green square of cardstock on the front of the card; adhere the light green cardstock on top of the dark green cardstock. Then adhere the layered heart on the light green cardstock.
Note: Other options for cutting the shapes from the kaleidoscope include cutting them by hand or punching them with graduated punches. (The punches will be much smaller than the Nestabilities dies.)
|