Supplies:
• Kaleidoscope Collections Kaleidoscope Kreator™ 3
• Digital or scanned photo
• PC with inkjet printer
• Glossy inkjet photo paper
• Matte inkjet photo paper
• Sharp scissors
• Metallic thread
• Medium purple regular thread
• 11” x 5.5” and 5” x 5” lavender cardstock
• Sewing machine
• Tape
• Small heart stamp
• Clear inkpad
• Glitter embossing powder
• Heat gun
• Adhesive
Instructions:
- Open digital photo in Kaleidoscope Kreator (File>Open Image). Click on the Select Kaleidoscope Shape button (the button with the wedge) in the toolbar to choose the “Star (16)” template shape. Move the photo around in the workspace to create a kaleidoscope design to your liking.
- File>Print Kaleidoscope. On the left side of the Print Kaleidoscope window, check “Maintain Proportions”, then enter 2.75” for the Width. Uncheck Print Margins, Show Cutlines and Center Kaleidoscope on Page. On the right side of the Print Kaleidoscope window, choose your printer at the top and click on Properties to select Glossy Photo paper. Click OK on the bottom right of the window to send to the printer.
- To make patterned paper that matches the kaleidoscope you just printed, click on the Select Kaleidoscope Shape button in the toolbar to choose one of the Square kaleidoscope template shapes (either 8, 12, 16 or 20 segments). Move the photo around in the workspace to create another kaleidoscope design to your liking.
- File>Print Multiple. On the left side of the Print Multiple window, check “Maintain Proportions”, enter 1.625” for the Width and 20 for the Quantity, then click Add. Uncheck Print Margins and Show Cutlines. On the right side of the Print Multiple window, set the printer for Matte Photo paper (or Presentation paper). Click OK on the bottom right of the window to send to the printer.
- Cut out the star kaleidoscope using sharp scissors.
- Tape the end of the metallic thread to the back of the star kaleidoscope, then wrap the star in a Spirelli fashion. (You may need to go around twice since the thread is fairly thin. Or just use a thicker thread.) Tape the other end to the back.
- Apply foam adhesive to the back of the star kaleidoscope and set aside.
- Cut two 1-5/8” x 3-1/4” rectangles from the kaleidoscope patterned paper.
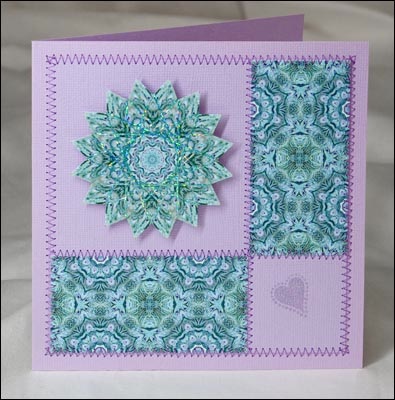
- Adhere the rectangles to the 5” x 5” square of cardstock as shown.
- Using a sewing machine, zig-zag stitch along the inside edges of the rectangles. Secure the ends of the thread on the back with tape.
- Stamp a small heart on the cardstock in the bottom right corner. Sprinkle embossing powder over it, remove excess, then heat with heat gun.
- Fold the 11” x 5.5” cardstock in half to form card base.
- Adhere the 5” x 5” square in the center of the front of the card.
- Zig-zag stitch around the outside edge of the 5” x 5” square. Pull the threads to the inside of the card and bury in the zig-zag stitches.
- Adhere the star kaleidoscope in the remaining space as shown.