Supplies:
• Kaleidoscope Collections Kaleidoscope Kreator™ 3
• Digital or scanned photo
• PC with inkjet printer
• Glossy inkjet photo paper
• Sharp scissors
• Glitter glue
• Paper piercer
• 8.5” x 5.5” green cardstock (for card base)
• 5.25” x 4” pink cardstock
• Scrap green cardstock (for leaves)
• 24” narrow ribbon
• 12” narrow rick-rack
• Tape
• Small paper fastener
• Permanent adhesive squares
Instructions:
- Open digital photo in Kaleidoscope Kreator (File>Open Image). Click on the Select Kaleidoscope Shape button (the one with the wedge) in the toolbar to choose the “Lotus (08)” template shape. Move the photo around in the workspace to create a kaleidoscope design to your liking.
- File>Print Multiple. On the left side of the Print Multiple window, check “Maintain Proportions”, then enter 3.0” for the Width, 1 for Quantity and click Add. Next change the Width to 2.5” and click Add. Finally change the Width to 2.0” and click Add. Uncheck Print Margins and Show Cutlines. On the right side of the Print Mutliple window, choose your printer at the top and click on Properties to select Glossy Photo paper. Click OK on the bottom right of the window to send to the printer.
- Cut out the kaleidoscopes using sharp scissors.
- (Optional) Apply glitter glue around the outside edge of each kaleidoscope. Let dry.
- For each kaleidoscope, fold in half (printed sides together) from one “valley” on the edge to another. Turn the kaleidoscope 90 degrees and fold in half again from valley to valley with printed sides together.
- Turn the kaleidoscopes over and fold in half between valleys that have not yet been folded – this time with wrong sides together. Turn 90 degrees and fold the remaining valley to valley again with wrong sides together.
- Bring each kaleidoscope together like a “cootie catcher” and gently bend back the petals of the flower.
- Use a paper piercer to poke a hole in the center of each kaleidoscope.
- Tear three leaf shapes (about 2” long) from green cardstock. Fold in half lengthwise. Then fold the right third up at 90 degrees. Divide the remaining length in half and fold up at 90 degrees again. Open to reveal fold lines creating “veins” in leaf.
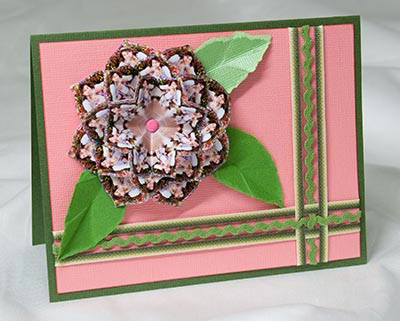
- Arrange ribbon on card as shown, weaving in the lower right corner. Attach with tape on the back of the pink cardstock.
- Push paper fastener through the middle of the smallest kaleidoscope first, then the middle size and finally the largest. Position on pink cardstock as shown and push through to fasten.
- Apply adhesive squares to the back base of each leaf, then position around the flower and press down to adhere.
- Fold the green cardstock in half to form card base. Adhere the pink cardstock with flower and ribbons to the front of the card.
|