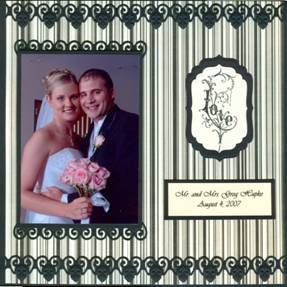
Love Layout
Designed by
Kim Hupke
Supplies
Spellbinders™
S4 190 Labels Four
S4-215 Renaissance Hearts Borderabilities
Crafty Secrets
Crafty Secrets Stamps Set Cherish Lg SL 11
WorldWin Paper
Treasurers Deep Black
Colormates Light Totally Tan
BoBunny
12” Unforgettable Stripe
- Cut/emboss eight Renaissance Hearts Borderabilities from black cardstock
- Adhere three Renaissance Hearts Borderabilities die cuts together by overlapping heart ends, making one long border, trim to 12 inches. Repeat this step
- Stamp “Love” image on tan paper, center #5 Labels Four die over image, cut/emboss
- Cut/emboss black cardstock with #6 Labels Four die
- Adhere wedding photo to black cardstock mat. Adhere one Renaissance Heart Borderability to each the top and bottom edge of black mat as shown on illustration
- Computer generate wedding date, mat on black cardstock
- Trim ¼” from each side of 12x12 black dot paper
- Assemble project as shown in sample
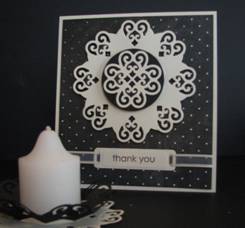
Thank You Card
Design by
Kim Hupke
Supplies
Spellbinders™
S4-206 Renaissance Heart Pendants
S3-150 Ribbon Tags Trio
S4-114 Standard Circles Large
WorldWin
Treasurers Deep Black
Colormates Light Totally Tan
BoBunny
12” Unforgettable Kiss
Hero Arts
Clear Design Thoughtful
Ribbon
Black Ink
- Cut/emboss large and small Pendant die templates, stencil with black ink.
- Cut/emboss #3 die template from Standard Circles Large Set
- Stamp “Thank You” on tan cardstock, center Ribbon Tag die template over image, tape to paper, cut/emboss die template
- Stack Pendant and Circle die cuts as shown in example using pop dots to create depth.
- Assemble card as shown in example.
|