Blending pens can be used to create special colors and color effects. It creates wonderful shadows and richness and it enables you to blend several hues together, giving more variation with color. A Blending Pen can be used with many products to create shading. You can color the interior border of an area with a marker or watercolor pencils, use the blending pen to pull color towards the center of the area. This will give your project a beautiful soft watercolor look. In this segment we show you a variety of techniques for blending shown in the layout.
Step 1: Beginning the layout section
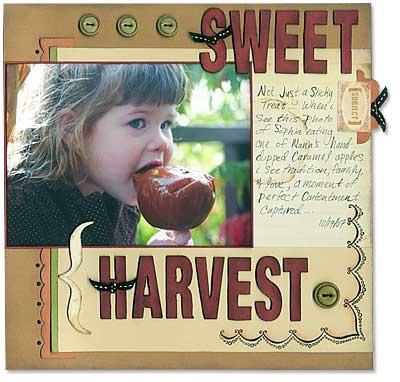
* To begin cut Bamboo Textured Cardstock and Notebook Background & Textured paper to dimensions specified in the Front and Center Focal Pattern in Reflections by Jeanette Lynton(Page 71).
* Adhere lined Notebook Background & Textured paper to Textured Bamboo Cardstock according to pattern specifications.
Step 2: Stamping and blending corner element
* Using Staz-on ink, stamp corner element onto layout.
* Because the stamp is so large, if you miss any spots stamping, you can touch up the image with a black My Legacy Writer Pen AFTER you have used the blending pen.
* Highlight stamped image using a Blending Pen and Sorbet Exclusive Inks stamp pad; in each individual curve of stamped image, dab Blending Pen on Sorbet Ink pad and softly pull color towards the center of the page; gently feather the color out in an upwards motion creating a variegated look; repeat same process with Brown Bag Exclusive Inks stamp pad to add contrast.
Step 3: Stamping and blending coffee stain
* Using Coffee Stain Acrylic stamp, ink with Bamboo Exclusive Inks stamp pad and rock and roll image with Desert Sand Exclusive Inks stamp pad.
* Stamp first generation on scratch paper.
* Stamp Second generation on Notebook Background & Textured paper on layout.
* Using Blending Pen and Desert Sand Exclusive Inks stamp pad, softly blend image to create the look of a natural coffee stain.
Step 4: Embellishing with blending pen
* Use Blending Pen to create textured look on Dimensional Elements letters. First cover letter with Barn Red Cardstock then use a black marker to color edges of letter. Lightly sponge edges of letter; use Blending Pen soften to sponged edges.
* Use Blending Pen to create custom buttons. Trace around inner rim of buttons with black marker then use Blending Pen to soften marker. Rub excess color off on apron or paper towel.
|